对于数据库开发,一直以来都是Java 开发的核心内容之一。在Java的发展历史中,数据库持久层的主流技术随着时代的变化也发生了变化。
在Java中访问数据库是SUN公司提出的JDBC规范,但是因为它需要的冗余代码比较多,加上流程和资源比较难以控制,如烦琐的try...catch...finally...语句,使得当时的Java EE的开发受到了很大的质疑, 所以使用JDBC开发的模式很快就走到了尽头。SUN公司早年推出的EJB,虽然能够支持持久化,但是因为配置极为烦琐,所以很快就被新兴的Hibernate框架取代。再后来Sun公司为了简化持久层,吸收了很多Hibernate的成果,制定了JPA规范,并且JPA规范在EJB 3.0得以支持。但EJB 3.0并没有能兴旺起来,而Hibernate 3.2则对JPA实现了完全支持。EJB同样是一个失败的产品,被埋没在历史的长河之中。
对于全映射框架Hibernate,在以管理系统为主的时代,它的模型化十分有利于公司业务的分析和理解,但是在近年兴起的移动互联网时代,这样的模式却走到了尽头。Hibernate的模式重模型和业务分析,移动互联网虽然业务相对简单,但却更关注大数据和大并发下的性能问题。全表映射规则下的Hibernate巳无法满足SQL优化和互联网灵活多变的业务,于是Hibernate近年来受到新兴的持久框架MyBatis的严重冲击,现今MyBatis 己经成为移动互联网时代的主流持久层框架,在移动互联网和一些新兴项目中MyBatis的占有率不断提升, Hibernate则是不断萎缩。MyBatis是一个不屏蔽SQL且提供动态SQL、接口式编程和简易SQL绑定POJO的半自动化框架,它的使用十分简单,而且能非常容易定制SQL,以提高网站性能,因此在移动互联网兴起的时代,它占据了强势的地位。
Spring支持JdbcTemplate的数据库访问模式,但这个用法一直未被很多企业采用。不过正如Spring所倡导的理念,它并不排斥其他优秀的框架,而是通过提供各种各样的模板,使得这些框架能够整合到Spring中来,并且更加方便开发者的使用。
不过一切开始之前,都要先完成数据源的配置。在SpringBoot中,己经自动默认数据源的配置,下面我们来了解这方面的细节。
在依赖于SpringBoot的spring-boot-starter-data-jpa后,它就会默认为你配置数据源,这些默认h2、hqldb和Derby等内存数据
1 2 3 4 5 6 7 8 9 <dependency > <groupId > org.springframework.boot</groupId > <artifactId > spring-boot-starter-data-jpa</artifactId > </dependency > <dependency > <groupId > com.h2database</groupId > <artifactId > h2</artifactId > <scope > runtime</scope > </dependency >
这样我们就可以在不使用任何配置数据库的情况下运行SpringBoot工程了,因为h2是内嵌式数据库,当然我们也可以将数据源配置为hqldb或者Derby,它会随着SpringBoot项目的启动而启动,并不需要任何的配置,但这显然不是我们期待的。因为这样的内存数据库在应用上并不广泛
下面以MySQL为例配置自定义数据源。
首先添加Mysql的依赖和JDBC的依赖
1 2 3 4 5 6 7 8 9 10 11 12 <dependency > <groupId > mysql</groupId > <artifactId > mysql-connector-java</artifactId > </dependency > <dependency > <groupId > org.springframework.boot</groupId > <artifactId > spring-boot-starter-jdbc</artifactId > </dependency > <dependency > <groupId > org.apache.commons</groupId > <artifactId > commons.dbcp2</artifactId > </dependency >
然后配置application.properties文件以配置数据源
1
2
3
4
spring.datasource.url=jdbc:mysql://127.0.0.1:3306/cosmetic_store?useUnicode=true&characterEncoding=UTF-8&serverTimezone=Asia/Shanghai&useSSL=false spring.datasource.username=root spring.datasource.password=123456 #spring.datasource.driver-class-name=com.mysql.cj.jdbc.Driver
这里注释掉了驱动器的配置,但它仍可以连接数据源,SpringBoot会尽可能地去判断数据源是什么类型,然后根据其默认地情况匹配驱动类
接下来我们配置application.properties文件以配置DBCP连接池
1
2
3
4
5
6
7
8
9
10
#指定连接池的类型 spring.datasource.type=org.apache.commons.dbcp2.BasicDataSource #最大等待连接中的数量,设 0 为没有限制 spring.datasource.dbcp2.max-idle=10 #最大连接活动数 spring.datasource.dbcp2.max-total=50 #最大等待毫秒数,单位为ms,超过时间会出错误信息 spring.datasource.dbcp2.max-wait-millis=10000 #数据库连接池初始化连接数 spring.datasource.dbcp2.initial-size=5
在配置数据源后,SpringBoot通过其自动配置机制配置好了JdbcTemplate, JdbcTemplate模板是Spring框架提供的。准确来说,JdbcTemplate这种方式也不算成功,
下面先创建一个Service接口和它对应的实现类
1
2
3
4
5
6
7
8
9
10
11
12
13
14
15
16
17
18
19
20
21
22
package com.springboot.chapter5.service;import java.util.List;import com.springboot.chapter5.pojo.User;public interface JdbcTmplUserService public User getUser (Long id) public List<User> findUsers (String userName, String note) public int insertUser (User user) public int updateUser (User user) public int deleteUser (Long id) public User getUser2 (Long id) public User getUser3 (Long id) }
1
2
3
4
5
6
7
8
9
10
11
12
13
14
15
16
17
18
19
20
21
22
23
24
25
26
27
28
29
30
31
32
33
34
35
36
37
38
39
40
41
42
43
44
45
46
47
48
49
50
51
52
53
54
55
56
57
58
59
60
61
62
63
64
65
66
67
68
69
70
71
72
73
74
75
76
77
78
79
80
81
82
83
84
85
86
87
88
89
90
91
92
93
94
95
96
97
98
99
100
101
102
103
104
105
106
107
108
109
110
111
112
113
114
115
116
117
118
119
120
121
122
123
124
125
126
127
128
129
130
131
132
133
134
135
package com.springboot.chapter5.service.impl;import java.sql.Connection;import java.sql.PreparedStatement;import java.sql.ResultSet;import java.sql.Statement;import java.util.List;import org.springframework.beans.factory.annotation.Autowired;import org.springframework.jdbc.core.JdbcTemplate;import org.springframework.jdbc.core.RowMapper;import org.springframework.stereotype.Service;import com.springboot.chapter5.enumeration.SexEnum;import com.springboot.chapter5.pojo.User;import com.springboot.chapter5.service.JdbcTmplUserService;@Service public class JdbcTmplUserServiceImpl implements JdbcTmplUserService @Autowired private JdbcTemplate jdbcTemplate = null ; private RowMapper<User> getUserMapper () RowMapper<User> userRowMapper = (ResultSet rs, int rownum) -> { User user = new User(); user.setId(rs.getLong("id" )); user.setUserName(rs.getString("user_name" )); int sexId = rs.getInt("sex" ); SexEnum sex = SexEnum.getEnumById(sexId); user.setSex(sex); user.setNote(rs.getString("note" )); return user; }; return userRowMapper; } @Override public User getUser (Long id) String sql = " select id, user_name, sex, note from t_user where id = ?" ; Object[] params = new Object[] { id }; User user = jdbcTemplate.queryForObject(sql, params, getUserMapper()); return user; } @Override public List<User> findUsers (String userName, String note) String sql = " select id, user_name, sex, note from t_user " + "where user_name like concat('%', ?, '%') " + "and note like concat('%', ?, '%')" ; Object[] params = new Object[] { userName, note }; List<User> userList = jdbcTemplate.query(sql, params, getUserMapper()); return userList; } @Override public int insertUser (User user) String sql = " insert into t_user (user_name, sex, note) values( ? , ?, ?)" ; return jdbcTemplate.update(sql, user.getUserName(), user.getSex().getId(), user.getNote()); } @Override public int updateUser (User user) String sql = " update t_user set user_name = ?, sex = ?, note = ? " + " where id = ?" ; return jdbcTemplate.update(sql, user.getUserName(), user.getSex().getId(), user.getNote(), user.getId()); } @Override public int deleteUser (Long id) String sql = " delete from t_user where id = ?" ; return jdbcTemplate.update(sql, id); } public User getUser2 (Long id) User result = this .jdbcTemplate.execute((Statement stmt) -> { String sql1 = "select count(*) total from t_user where id= " + id; ResultSet rs1 = stmt.executeQuery(sql1); while (rs1.next()) { int total = rs1.getInt("total" ); System.out.println(total); } String sql2 = " select id, user_name, sex, note from t_user" + " where id = " + id; ResultSet rs2 = stmt.executeQuery(sql2); User user = null ; while (rs2.next()) { int rowNum = rs2.getRow(); user= getUserMapper().mapRow(rs2, rowNum); } return user; }); return result; } public User getUser3 (Long id) return this .jdbcTemplate.execute((Connection conn) -> { String sql1 = " select count(*) as total from t_user" + " where id = ?" ; PreparedStatement ps1 = conn.prepareStatement(sql1); ps1.setLong(1 , id); ResultSet rs1 = ps1.executeQuery(); while (rs1.next()) { System.out.println(rs1.getInt("total" )); } String sql2 = " select id, user_name, sex, note from t_user " + "where id = ?" ; PreparedStatement ps2 = conn.prepareStatement(sql2); ps2.setLong(1 , id); ResultSet rs2 = ps2.executeQuery(); User user = null ; while (rs2.next()) { int rowNum = rs2.getRow(); user= getUserMapper().mapRow(rs2, rowNum); } return user; }); } }
对JdbcTemplate的映射关系需要开发者自己实现RowMapper接口,以完成数据库数据到POJO对象的映射
而且JdbcTemplate没调用一次就会产生一次数据库连接
也可以通过使用StatementCallback或ConnectionCallback接口来实现在一个连接中执行多条SQL
JPA所维护的核心是实体(EntityBean),而它是通过一个持久化上下文(Persistence Context)来使用的,持久化上下文包括以下3个部分
对象关系映射(Object Relational Mapping, ORM)描述,也就是在数据库表和POJO间建立关系
实体操作API,可以实现对实体对象的CRUD操作,来完成对象的持久化和查询
查询语言JPQL(Java Persistence Query Language)来实现更灵活的查询
此处略
目前Java持久层最为主流的技术己经是MyBatis,它比JPA和Hibernate更为简单易用,也更加灵活。移动互联网的时代面对的问题主要是大数据、高并发和性能问题。这正是MyBatis相较于Hibernate的优势
MyBatis是基于一种SQL到POJO的模型,它需要我们提供SQL、映射关系和POJO 。但是对于SQL和POJO的映射关系,它提供了自动映射和驼峰映射等,使开发者的开发工作大大减少
由于没有屏蔽SQL,这对于追求高响应和性能的互联网系统是十分重要的, 因此我们可以尽可能地通过SQL去优化性能,也可以做少量的改变以适应灵活多变的互联网应用。
与此同时,它还能支持动态SQL以适应需求的变化。
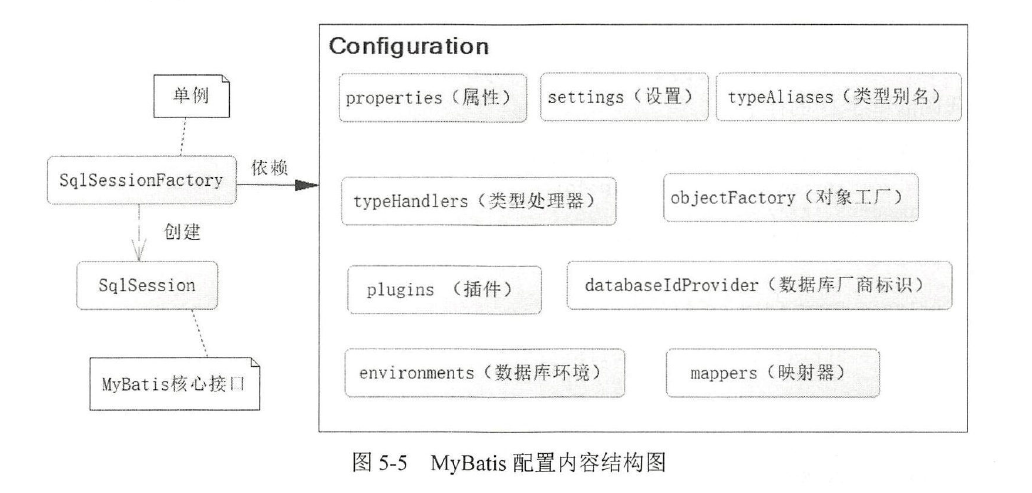
MyBatis是一个基于SqlSessionFactory构建的框架。对于SqlSessionFactory而言,它的作用是生SqlSession接口对象,这个接口对象是MyBatis操作的核心,而在MyBatis-Spring的结合中甚至可SqlSession是一个功能性的代码,"擦除"它之后,就剩下了业务代码,这样就可以使得代码更具可读性。
MyBatis的架构图如下所示
首先我们先定义一个Mapper接口来完成对数据库中Product表的CRUD
1
2
3
4
5
6
7
8
9
10
11
12
package com.edu.neu.hellospringboot.dao;import com.edu.neu.hellospringboot.pojo.Product;import org.apache.ibatis.annotations.Mapper;import org.apache.ibatis.annotations.Select;@Mapper public interface ProductDao @Select ("select * from product where product_id = #{productId}" ) Product getProduct (int productId) ; }
但是在上面我们可以看到Mapper是一个接口,是不可以使用new为其生成对象实例的。为了方便我们使用, MyBatis社区在与Spring整合的包中提供了两个类和一个注解,它们是MapperFactoryBean和MapperScannerConfigurerMyBatis和注解@MapperScan。它们能够将MyBatis所需的对应接口扫描装配到SpringIoC容器中。
这里我们以@MapperScan接口为例,它是这三种中最常用的。我们在SpringBoot的启动类上加入如下注解
1
2
3
4
5
6
7
8
9
10
11
12
13
14
15
16
package com.edu.neu.hellospringboot;import org.apache.ibatis.annotations.Mapper;import org.mybatis.spring.annotation.MapperScan;import org.springframework.boot.SpringApplication;import org.springframework.boot.autoconfigure.SpringBootApplication;@SpringBootApplication @MapperScan (basePackages = "com.edu.neu.hellospringboot.dao" , annotationClass = Mapper.class)public class HellospringbootApplication public static void main (String[] args) SpringApplication.run(HellospringbootApplication.class, args); } }
basePackage定义了要扫描的包annotationClass进行了注解限定,只有要扫描的包中被这个注解标注的接口才会被装载进容器。可以看到我们上面的代码使用了注解@Mapper来修饰ProductDao,所以这里把annotationClass设置为Mapper事实上我们亦可以使用@Repository这个注解
1
2
3
4
5
6
7
8
9
10
11
12
#假如我们使用xml来定义mapper可以用它来定义xml的地址 mybatis.mapper-locations=classpath:com/springboot/chapter5/mapper/*.xml #定义类型转换器 mybatis.type-handlers-package=com.springboot.chapter5.typehandler #MyBatis配置文件,当你的配置比较复杂的时候,可以使用去指定MyBatis本身的配置文件 mybatis.config-location=xxx #配置MyBaits 插件 mybatis.configuration.interceptors=xxx #级联延迟加载属性配置 mybatis.configuration.aggressive-lazyloading=xxx #属性映射中开启驼峰命名 mybatis.configuration.map-underscore-to-camel-case=true