映射文件的解析 过程是配置文件解析 过程的一部分 , MyBatis会在解析配置文件的过程中对映射文件进行解析。解析逻辑封装在mapperElement()方法中,我们把这个方法作为本章的总入口方法。
这个方法主要对<mappers>的每个子节点,按照不同的类型和属性,进行不同方式的解析,具体分派过程我放在源代码的注释中。
1 2 3 4 5 6 7 8 9 10 11 12 13 14 15 16 17 18 19 20 21 22 23 24 25 26 27 28 29 30 31 32 33 34 35 36 37 38 39 40 41 42 43 44 45 46 47 48 49 50 51 52 53 54 55 56 57 58 59 60 61 62 63 64 65 66 private void mapperElement (XNode parent) throws Exception if (parent != null ) { for (XNode child : parent.getChildren()) { if ("package" .equals(child.getName())) { String mapperPackage = child.getStringAttribute("name" ); configuration.addMappers(mapperPackage); } else { String resource = child.getStringAttribute("resource" ); String url = child.getStringAttribute("url" ); String mapperClass = child.getStringAttribute("class" ); if (resource != null && url == null && mapperClass == null ) { ErrorContext.instance().resource(resource); InputStream inputStream = Resources.getResourceAsStream(resource); XMLMapperBuilder mapperParser = new XMLMapperBuilder(inputStream, configuration, resource, configuration.getSqlFragments()); mapperParser.parse(); } else if (resource == null && url != null && mapperClass == null ) { ErrorContext.instance().resource(url); InputStream inputStream = Resources.getUrlAsStream(url); XMLMapperBuilder mapperParser = new XMLMapperBuilder(inputStream, configuration, url, configuration.getSqlFragments()); mapperParser.parse(); } else if (resource == null && url == null && mapperClass != null ) { Class<?> mapperInterface = Resources.classForName(mapperClass); configuration.addMapper(mapperInterface); } else { throw new BuilderException("A mapper element may only" + "specify a url, resource or class," + "but not more than one." ); } } } } }
从代码段3.0中,我们可以看出,对于某个节点的解析逻辑,主要放在XMLMapperBuilder的parse()方法中,这个parse()方法主要包含如下几步
mapper节点的具体解析过程将这个节点设置为已加载
通过命名空间绑定Mapper接口
处理各个未完成解析的节点
1 2 3 4 5 6 7 8 9 10 11 12 13 14 15 16 17 18 19 20 21 22 23 24 public void parse () if (!configuration.isResourceLoaded(resource)) { configurationElement(parser.evalNode("/mapper" )); configuration.addLoadedResource(resource); bindMapperForNamespace(); } parsePendingResultMaps(); parsePendingCacheRefs(); parsePendingStatements(); }
1 2 3 4 5 6 7 8 9 10 11 12 13 14 15 16 17 18 19 20 21 22 23 24 25 26 27 28 29 30 31 32 33 34 35 36 37 38 39 40 41 private void configurationElement (XNode context) try { String namespace = context.getStringAttribute("namespace" ); if (namespace == null || namespace.equals("" )) { throw new BuilderException("Mapper's namespace cannot be empty" ); } builderAssistant.setCurrentNamespace(namespace); cacheRefElement(context.evalNode("cache-ref" )); cacheElement(context.evalNode("cache" )); parameterMapElement(context.evalNodes("/mapper/parameterMap" )); resultMapElements(context.evalNodes("/mapper/resultMap" )); sqlElement(context.evalNodes("/mapper/sql" )); buildStatementFromContext(context.evalNodes("select|insert|update|delete" )); } catch (Exception e) { throw new BuilderException("Error parsing Mapper XML. The XML location is '" + resource + "'. Cause: " + e, e); } }
从上述代码段,我们可以得知,configurationElement()主要对单个<mapper>节点的各个类型的子节点进行解析,包括<cache>、<cache-ref>、<parameterMap>、<resultMap>、<sql>、<select>、<insert>、<update>、<delete>等子节点。在本节的剩余部分,我们将挑选几个有特点的<mapper>节点的子节点进行解析。
<cache>节点MyBatis提供了一、二级缓存,其中一级缓存是SqlSession级别的,默认为开启状态。二级缓存配置在映射文件中,使用者需要显式配置才能开启。
下面的代码段给出了一个配置二级缓存的例子
1 2 3 4 5 6 <cache eviction ="FIFO" flushInterval ="60000" size ="512" readOnly ="true" />
那么我们废话少说,从代码块3.2的22行cacheElement(context.evalNode("cache"));向下,具体分析cacheElement()方法的逻辑。
1 2 3 4 5 6 7 8 9 10 11 12 13 14 15 16 17 18 19 20 21 22 23 24 25 26 27 28 29 30 31 32 33 34 35 private void cacheElement (XNode context) if (context != null ) { String type = context.getStringAttribute("type" , "PERPETUAL" ); Class<? extends Cache> typeClass = typeAliasRegistry.resolveAlias(type); String eviction = context.getStringAttribute("eviction" , "LRU" ); Class<? extends Cache> evictionClass = typeAliasRegistry.resolveAlias(eviction); Long flushInterval = context.getLongAttribute("flushInterval" ); Integer size = context.getIntAttribute("size" ); boolean readWrite = !context.getBooleanAttribute("readOnly" , false ); boolean blocking = context.getBooleanAttribute("blocking" , false ); Properties props = context.getChildrenAsProperties(); builderAssistant.useNewCache(typeClass, evictionClass, flushInterval, size, readWrite, blocking, props); } }
cacheElement方法的逻辑还是比较简单的,它从<cache>节点上读取各种配置,然后使用这些配置。调用Mapper建造助手来构建一个新的缓存。下面我们从这个代码段的27行builderAssistant.useNewCache(typeClass,evictionClass,flushInterval,size,readWrite,blocking,props);向下,具体分析缓存的构造过程。
1 2 3 4 5 6 7 8 9 10 11 12 13 14 15 16 17 18 19 20 21 22 23 24 25 26 27 28 29 public Cache useNewCache (Class<? extends Cache> typeClass, Class<? extends Cache> evictionClass, Long flushInterval, Integer size, boolean readWrite, boolean blocking, Properties props) Cache cache = new CacheBuilder(currentNamespace) .implementation(valueOrDefault(typeClass, PerpetualCache.class)) .addDecorator(valueOrDefault(evictionClass, LruCache.class)) .clearInterval(flushInterval) .size(size) .readWrite(readWrite) .blocking(blocking) .properties(props) .build(); configuration.addCache(cache); currentCache = cache; return cache; }
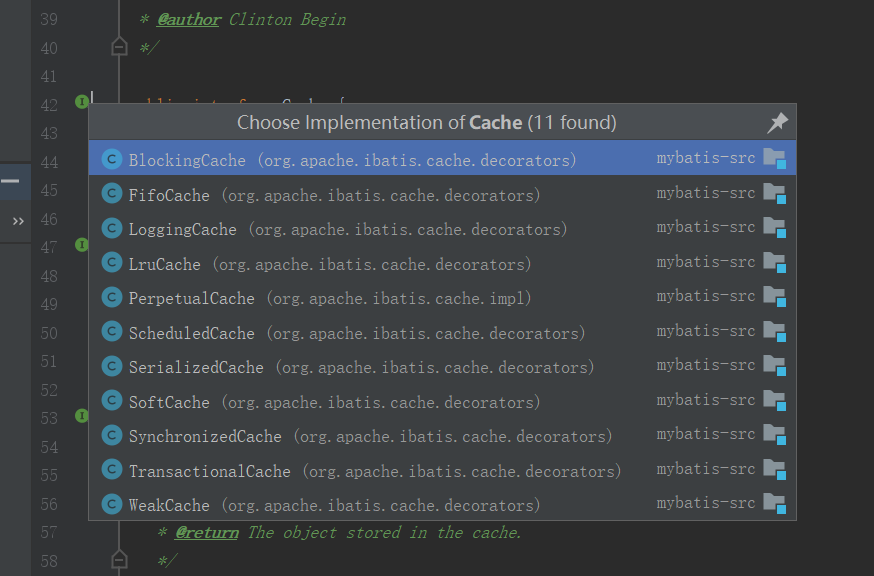
在我们继续深入源代码之前,首先我想介绍一个Mybatis的Cache接口极其实现类的设计。它使用一个装饰器模式。首先Cache接口有一个普通实现,PerpetualCache,它仅提供最基本的缓存功能,如果还需要其他功能,就需要将这个类作为delegate,包装到Cache接口的其他装饰器,例如,若我们想让Cache具有日志功能,就使用LoggingCache。下图展示了Cache接口的大量实现。
在了解了Cache接口的设计后,我们从3.5代码段的第21行CacheBuilder.build()向下,看看build()具体做了什么工作
1 2 3 4 5 6 7 8 9 10 11 12 13 14 15 16 17 18 19 20 21 22 23 24 25 26 27 28 29 30 public Cache build () setDefaultImplementations(); Cache cache = newBaseCacheInstance(implementation, id); setCacheProperties(cache); if (PerpetualCache.class.equals(cache.getClass())) { for (Class<? extends Cache> decorator : decorators) { cache = newCacheDecoratorInstance(decorator, cache); setCacheProperties(cache); } cache = setStandardDecorators(cache); } else if (!LoggingCache.class.isAssignableFrom(cache.getClass())) { cache = new LoggingCache(cache); } return cache; }
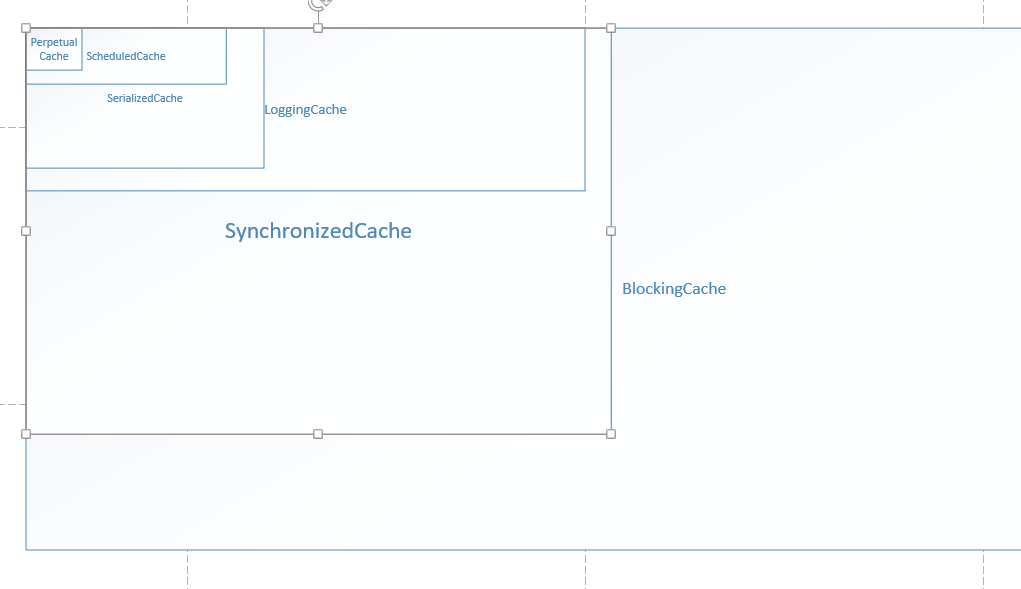
第13行的setCacheProperties(cache);主要将<cache>节点的各个<property>子节点设置进Cache的具体实现中,这个没什么可分析的,跳过它。这里,我们继续分析23行的cache = setStandardDecorators(cache);看看PerpetualCache都会被设置哪些标准装饰器。
1 2 3 4 5 6 7 8 9 10 11 12 13 14 15 16 17 18 19 20 21 22 23 24 25 26 27 28 29 30 31 32 33 34 35 36 37 38 private Cache setStandardDecorators (Cache cache) try { MetaObject metaCache = SystemMetaObject.forObject(cache); if (size != null && metaCache.hasSetter("size" )) { metaCache.setValue("size" , size); } if (clearInterval != null ) { cache = new ScheduledCache(cache); ((ScheduledCache) cache).setClearInterval(clearInterval); } if (readWrite) { cache = new SerializedCache(cache); } cache = new LoggingCache(cache); cache = new SynchronizedCache(cache); if (blocking) { cache = new BlockingCache(cache); } return cache; } catch (Exception e) { throw new CacheException("..." ); } }
结合上述代码,这里画一个图,来表示标准装饰器的装饰顺序
<resultMap>节点对于resultMap,引用官方文档的一段话,来说明其强大作用。
resultMap元素是MyBatis中最重要最强大的元素。它可以让你从90%的 JDBC ResultSet数据提取代码中解放出来,并在一些情形下允许你做一些JBC不支持的事情。实际上,在对复杂语句进行联合映射的时候,它很可能可以代替数千行的同等功能的代码。 ResultMap的设计思想是,简单的语句不需要明确的结果映射,而复杂一点的语句只需要描述它们的关系就行了。
在分析源代码之前我们使用一个复杂的resultMap的例子来展示它的强大功能
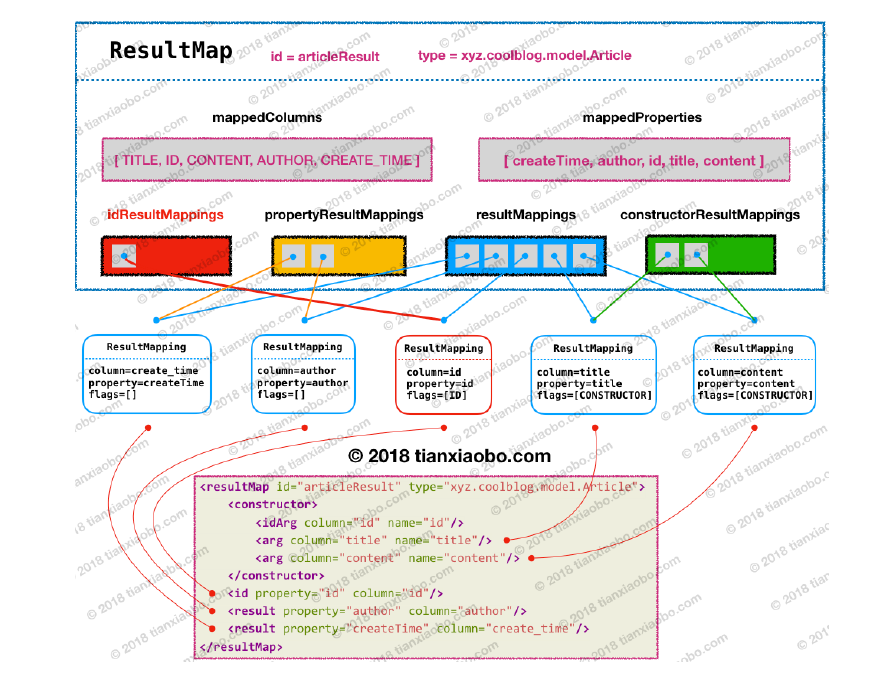
1 2 3 4 5 6 7 8 9 10 11 12 13 14 <resulpMap type ="com.edu.neu.pojo.Employee" id ="employee" > <constructor > <idArg column ="id" property ="id" javaType ="int" jdbcType ="INT" /> <arg column ="real_name" property ="realName" /> <arg column ="email" property ="email" /> </constructor > <id column ="id" property ="id" /> <result column ="real_name" property ="realName" /> <result column ="sex" property ="sex" typeHandler ="com.edu.neu.Handler.SexTypeHandler" /> <result column ="email" property ="email" /> <association property ="workCard" column ="id" select ="com.edu.neu.mapper.WorkCardMapper.getWorkCardByEmpId" /> <collection property ="employeeTaskList" column ="id" select ="com.edu.neu.mapper.EmployeeTaskMapper.getEmployeeTaskByEmpId" /> </resulpMap >
这个例子几乎把<resultMap>的子节点演示遍了。下面解释一下这些子节点的作用
constructor元素:用来配置一个构造方法。MyBatis会根据这个配置找到合适的构造方法对这个类实例化result元素:配置的是POJO成员变量到SQL列的映射关系,column代表SQL列名,property代表属性名id元素:除了具有result元素的功能,还表示了哪个列是主键,其实就是唯一标识列,不一定非要是主键。association元素:用来配置一个一对一的级联,例如上述代码段:当使用这个resultMap时,还会顺便把WorkCard也根据id从数据库中取出collection元素:与association元素类似,也是完成级联,但是它用于一对多级联,它将返回一个java.util.List其他子节点并不常见,这里就不介绍了。
在正式分析解析逻辑之前,我们先看看存储结构,所有解析完成的ResultMap都将存放在Configuration的成员变量resultMaps中,这个Map的键为我们为<resultMap>节点指定的id属性,例如代码清单3.8的employee就将成为这个resultMap的key。而值为一个org.apache.ibatis.mapping.ResultMap的实例,这个类存储了单个<resultMap>的解析结果。
1 2 3 4 5 protected final Map<String, ResultMap> resultMaps = new StrictMap<>("Result Maps collection" );
下面我们再看看上文中提到的org.apache.ibatis.mapping.ResultMap中都存放了什么吧
1 2 3 4 5 6 7 8 9 10 11 12 13 14 15 16 17 18 19 20 21 22 23 24 25 26 27 28 29 30 31 32 33 34 35 36 37 38 39 40 41 42 43 44 45 46 public class ResultMap private Configuration configuration; private String id; private Class<?> type; private List<ResultMapping> resultMappings; private List<ResultMapping> idResultMappings; private List<ResultMapping> constructorResultMappings; private List<ResultMapping> propertyResultMappings; private Set<String> mappedColumns; private Set<String> mappedProperties; private Discriminator discriminator; private boolean hasNestedResultMaps; private boolean hasNestedQueries; private Boolean autoMapping; }
其实,说白了,就是把单个<result>、<id>的解析结果,按照不同的类型,在不同的List中存放了起来,仅此而已。下图是个很好的例子。
但是这还没完,上述代码块用到的ResultMapping类,它看起来是存储单个POJO-SQL映射的类,我们接着分析它。
1 2 3 4 5 6 7 8 9 10 11 12 13 14 15 16 17 18 19 20 21 22 23 24 25 26 27 28 29 30 31 32 33 34 35 36 public class ResultMapping private Configuration configuration; private String property; private String column; private Class<?> javaType; private JdbcType jdbcType; private TypeHandler<?> typeHandler; private String nestedResultMapId; private String nestedQueryId; private Set<String> notNullColumns; private String columnPrefix; private List<ResultFlag> flags; private List<ResultMapping> composites; private String resultSet; private String foreignColumn; private boolean lazy; }
那么resultMap的存储结构就分析完了,我们继续看源码,从代码清单3.2的28行resultMapElements(context.evalNodes("/mapper/resultMap"));向下,详细分析resultMap的解析过程
1 2 3 4 5 6 7 8 9 10 11 12 13 14 15 16 17 18 19 20 21 22 23 24 25 26 27 28 29 30 31 32 33 34 35 36 37 38 39 40 41 42 43 44 45 46 47 48 49 50 51 52 53 54 55 56 57 58 59 60 61 62 63 64 65 66 67 68 69 70 71 72 73 74 75 76 77 78 79 80 81 82 83 84 85 86 87 88 89 90 91 92 93 94 95 96 97 98 99 100 private void resultMapElements (List<XNode> list) throws Exception for (XNode resultMapNode : list) { try { resultMapElement(resultMapNode); } catch (IncompleteElementException e) { } } } private ResultMap resultMapElement (XNode resultMapNode) throws Exception return resultMapElement(resultMapNode, Collections.emptyList(), null ); } private ResultMap resultMapElement (XNode resultMapNode, List<ResultMapping> additionalResultMappings, Class<?> enclosingType) throws Exception ErrorContext.instance().activity("processing " + resultMapNode.getValueBasedIdentifier()); String type = resultMapNode.getStringAttribute("type" , resultMapNode.getStringAttribute("ofType" , resultMapNode.getStringAttribute("resultType" , resultMapNode.getStringAttribute("javaType" )))); Class<?> typeClass = resolveClass(type); if (typeClass == null ) { typeClass = inheritEnclosingType(resultMapNode, enclosingType); } Discriminator discriminator = null ; List<ResultMapping> resultMappings = new ArrayList<>(); resultMappings.addAll(additionalResultMappings); List<XNode> resultChildren = resultMapNode.getChildren(); for (XNode resultChild : resultChildren) { if ("constructor" .equals(resultChild.getName())) { processConstructorElement(resultChild, typeClass, resultMappings); } else if ("discriminator" .equals(resultChild.getName())) { discriminator = processDiscriminatorElement(resultChild, typeClass, resultMappings); } else { List<ResultFlag> flags = new ArrayList<>(); if ("id" .equals(resultChild.getName())) { flags.add(ResultFlag.ID); } resultMappings. add(buildResultMappingFromContext(resultChild, typeClass, flags)); } } String id = resultMapNode.getStringAttribute("id" , resultMapNode.getValueBasedIdentifier()); String extend = resultMapNode.getStringAttribute("extends" ); Boolean autoMapping = resultMapNode.getBooleanAttribute("autoMapping" ); ResultMapResolver resultMapResolver = new ResultMapResolver(builderAssistant, id, typeClass, extend, discriminator, resultMappings, autoMapping); try { return resultMapResolver.resolve(); } catch (IncompleteElementException e) { configuration.addIncompleteResultMap(resultMapResolver); throw e; } }
上述resultMapElement解析过程还是挺复杂的,这里总结一下,它完成的几项工作
获取<resultMap>节点的各种属性
解析<resultMap>的所有子节点,并把返回结果存起来
用第1步和第2步获取的信息构造一个ResultMap对象
若第3步构造失败,则添加到未成功解析列表并抛出异常
第1步比较简单,大家一看就懂。第2步将在3.2.2.1中展开分析。第3步将在3.2.2.2中展开分析。
<resultMap>节点中的<id>节点和<result>节点本节以<id>节点和<result>节点为例,分析<resultMap>节点的子节点是如何解析的。那我们从代码清单3.12的71行resultMappings.add(buildResultMappingFromContext(resultChild, typeClass, flags));向下。
1 2 3 4 5 6 7 8 9 10 11 12 13 14 15 16 17 18 19 20 21 22 23 24 25 26 27 28 29 30 31 32 33 34 35 36 37 38 39 40 41 42 43 44 45 46 47 48 49 50 51 52 53 54 55 56 57 58 59 60 61 private ResultMapping buildResultMappingFromContext ( XNode context, Class<?> resultType, List<ResultFlag> flags) throws Exception String property; if (flags.contains(ResultFlag.CONSTRUCTOR)) { property = context.getStringAttribute("name" ); } else { property = context.getStringAttribute("property" ); } String column = context.getStringAttribute("column" ); String javaType = context.getStringAttribute("javaType" ); String jdbcType = context.getStringAttribute("jdbcType" ); String nestedSelect = context.getStringAttribute("select" ); String nestedResultMap = context.getStringAttribute("resultMap" , processNestedResultMappings(context, Collections.emptyList(), resultType)); String notNullColumn = context.getStringAttribute("notNullColumn" ); String columnPrefix = context.getStringAttribute("columnPrefix" ); String typeHandler = context.getStringAttribute("typeHandler" ); String resultSet = context.getStringAttribute("resultSet" ); String foreignColumn = context.getStringAttribute("foreignColumn" ); boolean lazy = "lazy" .equals( context.getStringAttribute( "fetchType" , configuration.isLazyLoadingEnabled() ? "lazy" : "eager" )); Class<?> javaTypeClass = resolveClass(javaType); Class<? extends TypeHandler<?>> typeHandlerClass = resolveClass(typeHandler); JdbcType jdbcTypeEnum = resolveJdbcType(jdbcType); return builderAssistant.buildResultMapping( resultType, property, column, javaTypeClass, jdbcTypeEnum, nestedSelect, nestedResultMap, notNullColumn, columnPrefix, typeHandlerClass, flags, resultSet, foreignColumn, lazy); }
这个方法实在乏善可陈,它只是从<result>或者<id>节点上获取了各种属性,然后将这些获取到的属性统统传递给builderAssistant.buildResultMapping(),然后这个助手类完成真正的解析工作并返回ResultMapping对象
1 2 3 4 5 6 7 8 9 10 11 12 13 14 15 16 17 18 19 20 21 22 23 24 25 26 27 28 29 30 31 32 33 34 35 36 37 38 39 40 41 public ResultMapping buildResultMapping ( Class<?> resultType, String property, String column, Class<?> javaType, JdbcType jdbcType, String nestedSelect, String nestedResultMap, String notNullColumn, String columnPrefix, Class<? extends TypeHandler<?>> typeHandler, List<ResultFlag> flags, String resultSet, String foreignColumn, boolean lazy) Class<?> javaTypeClass = resolveResultJavaType(resultType, property, javaType); TypeHandler<?> typeHandlerInstance = resolveTypeHandler(javaTypeClass, typeHandler); List<ResultMapping> composites = parseCompositeColumnName(column); return new ResultMapping.Builder(configuration, property, column, javaTypeClass) .jdbcType(jdbcType) .nestedQueryId(applyCurrentNamespace(nestedSelect, true )) .nestedResultMapId(applyCurrentNamespace(nestedResultMap, true )) .resultSet(resultSet) .typeHandler(typeHandlerInstance) .flags(flags == null ? new ArrayList<>() : flags) .composites(composites) .notNullColumns(parseMultipleColumnNames(notNullColumn)) .columnPrefix(columnPrefix) .foreignColumn(foreignColumn) .lazy(lazy) .build(); }
至于这个ResultMapping.Builder就不继续深入了,它是一个简单的建造者负责建造ResultMapping。其实就是通过各种方法调用,为ResultMapping的实例设置属性而已。设置完成后,调用build()直接返回这个实例。
下面总结一下,对于<id>和<result>这种代表单个POJO-SQL映射的标签,MyBatis会将标签携带的属性进行解析,并全部存放在一个ResultMapping实例中返回。
ResultMap对象的过程我们从代码清单3.12的93行return resultMapResolver.resolve();,看看这个解析器是如何构建ResultMap的
1 2 3 4 5 6 7 8 9 10 11 public ResultMap resolve () return assistant.addResultMap(this .id, this .type, this .extend, this .discriminator, this .resultMappings, this .autoMapping); }
代码清单3.13实际上调用了建造器助手的addResultMap方法,我们继续向下
1 2 3 4 5 6 7 8 9 10 11 12 13 14 15 16 17 18 19 20 21 22 23 24 25 26 27 28 29 30 31 32 33 34 35 36 37 38 39 40 41 42 43 44 45 46 47 48 49 50 51 52 53 54 55 56 57 58 59 60 61 62 public ResultMap addResultMap (String id, Class<?> type, String extend, Discriminator discriminator, List<ResultMapping> resultMappings, Boolean autoMapping) id = applyCurrentNamespace(id, false ); extend = applyCurrentNamespace(extend, true ); if (extend != null ) { if (!configuration.hasResultMap(extend)) { throw new IncompleteElementException( "Could not find a parent resultmap with id '" + extend + "'" ); } ResultMap resultMap = configuration.getResultMap(extend); List<ResultMapping> extendedResultMappings = new ArrayList<>(resultMap.getResultMappings()); extendedResultMappings.removeAll(resultMappings); boolean declaresConstructor = false ; for (ResultMapping resultMapping : resultMappings) { if (resultMapping.getFlags().contains(ResultFlag.CONSTRUCTOR)) { declaresConstructor = true ; break ; } } if (declaresConstructor) { extendedResultMappings.removeIf( resultMapping -> resultMapping. getFlags().contains(ResultFlag.CONSTRUCTOR) ); } resultMappings.addAll(extendedResultMappings); } ResultMap resultMap = new ResultMap.Builder(configuration, id, type, resultMappings, autoMapping) .discriminator(discriminator) .build(); configuration.addResultMap(resultMap); return resultMap; }
这个方法实际上做了这几件事
处理resultMap的继承(extend属性)
通过ResultMap的建造者构造ResultMap实例
将这个ResultMap实例保存到configuration的resultMaps中
下面我们继续看看这个建造者是怎么完成建造工作的。
1 2 3 4 5 6 7 8 9 10 11 12 13 14 15 16 17 18 19 20 21 22 23 24 25 26 27 28 29 30 31 32 33 34 35 36 37 38 39 40 41 42 43 44 45 46 47 48 49 50 51 52 53 54 55 56 57 58 59 60 61 62 63 64 65 66 67 68 69 70 71 72 73 74 75 76 77 78 79 80 81 82 83 84 85 86 87 88 89 90 91 92 93 94 95 96 97 98 99 100 101 102 103 104 105 106 107 108 109 110 111 112 113 114 115 116 117 public ResultMap build () if (resultMap.id == null ) { throw new IllegalArgumentException("ResultMaps must have an id" ); } resultMap.mappedColumns = new HashSet<>(); resultMap.mappedProperties = new HashSet<>(); resultMap.idResultMappings = new ArrayList<>(); resultMap.constructorResultMappings = new ArrayList<>(); resultMap.propertyResultMappings = new ArrayList<>(); final List<String> constructorArgNames = new ArrayList<>(); for (ResultMapping resultMapping : resultMap.resultMappings) { resultMap.hasNestedQueries = resultMap.hasNestedQueries || resultMapping.getNestedQueryId() != null ; resultMap.hasNestedResultMaps = resultMap.hasNestedResultMaps || (resultMapping.getNestedResultMapId() != null && resultMapping.getResultSet() == null ); final String column = resultMapping.getColumn(); if (column != null ) { resultMap.mappedColumns.add(column.toUpperCase(Locale.ENGLISH)); } else if (resultMapping.isCompositeResult()) { for (ResultMapping compositeResultMapping : resultMapping.getComposites()){ final String compositeColumn = compositeResultMapping.getColumn(); if (compositeColumn != null ) { resultMap.mappedColumns. add(compositeColumn.toUpperCase(Locale.ENGLISH)); } } } final String property = resultMapping.getProperty(); if (property != null ) { resultMap.mappedProperties.add(property); } if (resultMapping.getFlags().contains(ResultFlag.CONSTRUCTOR)) { resultMap.constructorResultMappings.add(resultMapping); if (resultMapping.getProperty() != null ) { constructorArgNames.add(resultMapping.getProperty()); } } else { resultMap.propertyResultMappings.add(resultMapping); } if (resultMapping.getFlags().contains(ResultFlag.ID)) { resultMap.idResultMappings.add(resultMapping); } } if (resultMap.idResultMappings.isEmpty()) { resultMap.idResultMappings.addAll(resultMap.resultMappings); } if (!constructorArgNames.isEmpty()) { final List<String> actualArgNames = argNamesOfMatchingConstructor(constructorArgNames); if (actualArgNames == null ) { throw new BuilderException("Error in result map '" + resultMap.id + "'. Failed to find a constructor in '" + resultMap.getType().getName() + "' by arg names " + constructorArgNames + ". There might be more info in debug log." ); } resultMap.constructorResultMappings.sort((o1, o2) -> { int paramIdx1 = actualArgNames.indexOf(o1.getProperty()); int paramIdx2 = actualArgNames.indexOf(o2.getProperty()); return paramIdx1 - paramIdx2; }); } resultMap.resultMappings = Collections.unmodifiableList(resultMap.resultMappings); resultMap.idResultMappings = Collections.unmodifiableList(resultMap.idResultMappings); resultMap.constructorResultMappings = Collections.unmodifiableList(resultMap.constructorResultMappings); resultMap.propertyResultMappings = Collections.unmodifiableList(resultMap.propertyResultMappings); resultMap.mappedColumns = Collections.unmodifiableSet(resultMap.mappedColumns); return resultMap; }
上面的代码比较长,但实际上就如代码清单3.10所示,它将传入的resultMappings列表中的元素,按照不同的特点放入了不同的列表和集合中,仅此而已。
到此,我们就完成了ResultMap对象的构建,并且将构建完的结果以id做键、ResultMap做值的形式存放到了configuration的resultMaps映射中。本节比较值得学习的就是MyBatis对于建造者模式的使用。
<sql>节点<sql>节点用来定义一些可重用的SQL语句片段,比如表名,或表的列名等。在映射文件中,我们可以通过 <include>节点引用<sql>节点定义的内容。
在分析源码之前,先来演示一下<sql>节点的使用方式
1 2 3 4 5 6 7 8 9 10 11 12 13 14 15 16 <sql id ="table" > article </sql > <select id ="findOne" resultType ="Article" > SELECT id, title FROM <include refid ="table" /> WHERE id = #{id} </select > <update id ="update" parameterType ="Article" > UPDATE <include refid ="table" /> SET title = #{title} WHERE id = #{id} </update >
然后,我们从代码清单3.2的32行sqlElement(context.evalNodes("/mapper/sql"));继续向下,看看对于<sql>节点的解析。
1 2 3 4 5 6 7 8 9 10 11 12 13 14 15 16 17 18 19 20 21 22 23 24 25 26 27 28 29 30 31 32 33 34 35 36 private final Map<String, XNode> sqlFragments;private void sqlElement (List<XNode> list) if (configuration.getDatabaseId() != null ) { sqlElement(list, configuration.getDatabaseId()); } sqlElement(list, null ); } private void sqlElement (List<XNode> list, String requiredDatabaseId) for (XNode context : list) { String databaseId = context.getStringAttribute("databaseId" ); String id = context.getStringAttribute("id" ); id = builderAssistant.applyCurrentNamespace(id, false ); if (databaseIdMatchesCurrent(id, databaseId, requiredDatabaseId)) { sqlFragments.put(id, context); } } }
<sql>节点的解析非常简单,它只不过是完成了以下几件事
通过databaseId筛选符合当前数据库的<sql>节点
将符合要求的节点加入sqlFragment映射,这个映射将在解析SQL语句节点时使用
并且,其实这个sqlFragement也是存储在Configuration中的,方便后面的使用。
下面是本章的重头戏,<select>、<insert>、<update>、<delete>等SQL语句节点的解析。这些节点的用处都是存储SQL语句,所以解析过程是相同的。
在分析之前,我们还是先看看在Configuration中解析完的信息是怎么储存的。对于每个SQL语句节点,MyBatis都会解析成一个MappedStatement的实例。然后在Configuration中,是通过以id为键,以MappedStatement本身为值存储在了一个Map中。
1
2
protected final Map<String, MappedStatement> mappedStatements = new StrictMap<MappedStatement>("Mapped Statements collection" );
接下来我们看看,上面提到的MappedStatement都存储了那些信息
1 2 3 4 5 6 7 8 9 10 11 12 13 14 15 16 17 18 19 20 21 22 23 24 25 26 27 28 29 30 31 32 33 34 35 36 37 38 39 40 41 42 43 44 45 46 47 48 49 50 51 public final class MappedStatement private String resource; private Configuration configuration; private String id; private Integer fetchSize; private Integer timeout; private StatementType statementType; private ResultSetType resultSetType; private SqlSource sqlSource; private Cache cache; private ParameterMap parameterMap; private List<ResultMap> resultMaps; private boolean flushCacheRequired; private boolean useCache; private boolean resultOrdered; private SqlCommandType sqlCommandType; private KeyGenerator keyGenerator; private String[] keyProperties; private String[] keyColumns; private boolean hasNestedResultMaps; private String databaseId; private Log statementLog; private LanguageDriver lang; private String[] resultSets; }
让我们详细展开上一个代码清单的20行private SqlSource sqlSource;看看SqlSource是什么
1 2 3 4 5 6 7 8 public interface SqlSource BoundSql getBoundSql (Object parameterObject) ; }
它是个接口,这个接口传入parameter,然后返回一个BoundSql实例。那我们接着看看BoundSql的结构
1 2 3 4 5 6 7 8 9 10 11 12 13 14 15 public class BoundSql private final String sql; private final List<ParameterMapping> parameterMappings; private final Object parameterObject; private final Map<String, Object> additionalParameters; private final MetaObject metaParameters; }
至此,和SQL语句有关的存储结构算是分析完了。
我们下面从代码清单3.2的34行buildStatementFromContext(context.evalNodes("select|insert|update|delete"));继续向下,看看MappedStatement是怎么构建的
1 2 3 4 5 6 7 8 9 10 11 12 13 14 15 16 17 18 19 20 21 22 23 24 25 26 private void buildStatementFromContext (List<XNode> list) if (configuration.getDatabaseId() != null ) { buildStatementFromContext(list, configuration.getDatabaseId()); } buildStatementFromContext(list, null ); } private void buildStatementFromContext (List<XNode> list, String requiredDatabaseId) for (XNode context : list) { final XMLStatementBuilder statementParser = new XMLStatementBuilder(configuration, builderAssistant, context, requiredDatabaseId); try { statementParser.parseStatementNode(); } catch (IncompleteElementException e) { configuration.addIncompleteStatement(statementParser); } } }
这个方法其实什么也没干,它制作遍历每个节点,然后把具体每个节点的解析交给XMLstatementBuilder的parseStatementNode()来处理,具体的解析逻辑都在这个方法里,那我们继续向下看看这个方法。
在看源码之前,先大体描述这个方法进行的几步操作
解析SQL语句中的<include>节点,第34行
解析SQL语句中的<selectKey>节点,第46行
解析SQL语句, 第67行
构建MappedStatement,第93行
1 2 3 4 5 6 7 8 9 10 11 12 13 14 15 16 17 18 19 20 21 22 23 24 25 26 27 28 29 30 31 32 33 34 35 36 37 38 39 40 41 42 43 44 45 46 47 48 49 50 51 52 53 54 55 56 57 58 59 60 61 62 63 64 65 66 67 68 69 70 71 72 73 74 75 76 77 78 79 80 81 82 83 84 85 86 87 88 89 90 91 92 93 94 95 96 97 98 99 100 101 102 103 104 105 106 107 108 109 110 111 112 113 114 public void parseStatementNode () String id = context.getStringAttribute("id" ); String databaseId = context.getStringAttribute("databaseId" ); if (!databaseIdMatchesCurrent(id, databaseId, this .requiredDatabaseId)) { return ; } String nodeName = context.getNode().getNodeName(); SqlCommandType sqlCommandType = SqlCommandType.valueOf(nodeName.toUpperCase(Locale.ENGLISH)); boolean isSelect = sqlCommandType == SqlCommandType.SELECT; boolean flushCache = context.getBooleanAttribute("flushCache" , !isSelect); boolean useCache = context.getBooleanAttribute("useCache" , isSelect); boolean resultOrdered = context.getBooleanAttribute("resultOrdered" , false ); XMLIncludeTransformer includeParser = new XMLIncludeTransformer(configuration, builderAssistant); includeParser.applyIncludes(context.getNode()); String parameterType = context.getStringAttribute("parameterType" ); Class<?> parameterTypeClass = resolveClass(parameterType); String lang = context.getStringAttribute("lang" ); LanguageDriver langDriver = getLanguageDriver(lang); processSelectKeyNodes(id, parameterTypeClass, langDriver); KeyGenerator keyGenerator; String keyStatementId = id + SelectKeyGenerator.SELECT_KEY_SUFFIX; keyStatementId = builderAssistant.applyCurrentNamespace(keyStatementId, true ); if (configuration.hasKeyGenerator(keyStatementId)) { keyGenerator = configuration.getKeyGenerator(keyStatementId); } else { keyGenerator = context.getBooleanAttribute("useGeneratedKeys" , configuration.isUseGeneratedKeys() && SqlCommandType.INSERT.equals(sqlCommandType)) ? Jdbc3KeyGenerator.INSTANCE : NoKeyGenerator.INSTANCE; } SqlSource sqlSource = langDriver.createSqlSource(configuration, context, parameterTypeClass); StatementType statementType = StatementType.valueOf(context.getStringAttribute( "statementType" , StatementType.PREPARED.toString())); Integer fetchSize = context.getIntAttribute("fetchSize" ); Integer timeout = context.getIntAttribute("timeout" ); String parameterMap = context.getStringAttribute("parameterMap" ); String resultType = context.getStringAttribute("resultType" ); Class<?> resultTypeClass = resolveClass(resultType); String resultMap = context.getStringAttribute("resultMap" ); String resultSetType = context.getStringAttribute("resultSetType" ); ResultSetType resultSetTypeEnum = resolveResultSetType(resultSetType); String keyProperty = context.getStringAttribute("keyProperty" ); String keyColumn = context.getStringAttribute("keyColumn" ); String resultSets = context.getStringAttribute("resultSets" ); builderAssistant.addMappedStatement( id, sqlSource, statementType, sqlCommandType, fetchSize, timeout, parameterMap, parameterTypeClass, resultMap, resultTypeClass, resultSetTypeEnum, flushCache, useCache, resultOrdered, keyGenerator, keyProperty, keyColumn, databaseId, langDriver, resultSets); }
下面的4小节,将分别展开这四个步骤
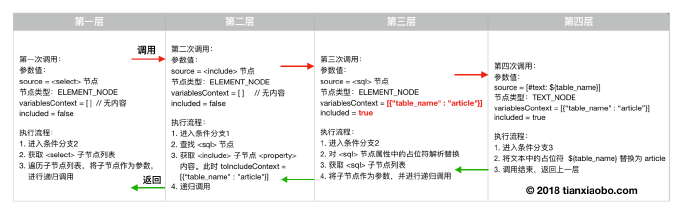
<include>节点注:下面的解析过程比较难,看不懂可以先看后面的例子。如果实在看不懂,这里讲一下这方法执行后的结果。它将XNODE树上的<include>节点替换成了包含对应sql语句的普通文本节点。也就是说,经过这一步的处理,<include>节点在XNODE树中消失了。我们在mapper文件的层次上举个不太恰切的例子。
在没进行解析时,XNODE树是这样的
1 2 3 4 5 6 7 8 9 10 11 12 13 14 15 16 17 <mapper namespace ="xyz.coolblog.dao.ArticleDao" > <sql id ="table" > ${table_name} </sql > <select id ="findOne" resultType ="xyz.coolblog.dao.Article" > SELECT id, title FROM <include refid ="table" > <property name ="table_name" value ="article" /> </include > WHERE id = #{id} </select > </mapper >
完成解析之后,它变成了一个再普通不过的sql
1 2 3 4 5 6 7 8 9 10 11 12 13 14 <mapper namespace ="xyz.coolblog.dao.ArticleDao" > <sql id ="table" > ${table_name} </sql > <select id ="findOne" resultType ="xyz.coolblog.dao.Article" > SELECT id, title FROM article WHERE id = #{id} </select > </mapper >
只不过上面的解析,不是在mapper文件的层面上进行的,而是在XNODE的层面进行的。大家体会理解意思即可。
然后我们从代码清单3.20第37行includeParser.applyIncludes(context.getNode());向下,看看<include>节点的解析过程。
1 2 3 4 5 6 7 8 9 10 11 12 13 14 15 16 17 18 19 20 21 22 23 24 25 26 27 28 29 30 31 32 33 34 35 36 37 38 39 40 41 42 43 44 45 46 47 48 49 50 51 52 53 54 55 56 57 58 59 60 61 62 63 64 65 66 67 68 69 70 71 72 73 74 75 76 77 private void applyIncludes (Node source, final Properties variablesContext, boolean included) if (source.getNodeName().equals("include" )) { Node toInclude = findSqlFragment(getStringAttribute(source, "refid" ), variablesContext); Properties toIncludeContext = getVariablesContext(source, variablesContext); applyIncludes(toInclude, toIncludeContext, true ); if (toInclude.getOwnerDocument() != source.getOwnerDocument()) { toInclude = source.getOwnerDocument().importNode(toInclude, true ); } source.getParentNode().replaceChild(toInclude, source); while (toInclude.hasChildNodes()) { toInclude.getParentNode(). insertBefore(toInclude.getFirstChild(), toInclude); } toInclude.getParentNode().removeChild(toInclude); } else if (source.getNodeType() == Node.ELEMENT_NODE) { if (included && !variablesContext.isEmpty()) { NamedNodeMap attributes = source.getAttributes(); for (int i = 0 ; i < attributes.getLength(); i++) { Node attr = attributes.item(i); attr.setNodeValue(PropertyParser.parse( attr.getNodeValue(), variablesContext)); } } NodeList children = source.getChildNodes(); for (int i = 0 ; i < children.getLength(); i++) { applyIncludes(children.item(i), variablesContext, included); } } else if ( included && source.getNodeType() == Node.TEXT_NODE && !variablesContext.isEmpty()) { source.setNodeValue( PropertyParser.parse( source.getNodeValue(), variablesContext)); } }
然后我们以代码清单3.21从8-12行的<select>节点的解析为例,详细看看<include>是怎么被替换的。
但是这里还要插入一个先序知识:在XNODE树中,所有的<xxx>标签会被解析为ELEMENT_NODE,而所有<xxx>和</xxx>间的文本将被解析为TEXT_NODE,除此之外还有ATTRIBUTE_NODE、COMMENT_NODE等很多节点类型,有兴趣可以查看org.w3c.dom.Node接口
那么这个<select>节点的类型为ELEMENT_NODE,它有三个子节点,如下表
编号
子节点
类型
描述
1
SELECT id,title FROMTEXT_NODE文本节点
2
<include refid="table"/>ELEMENT_NODE普通节点
3
WHERE id= #{id}TEXT_NODE文本节点
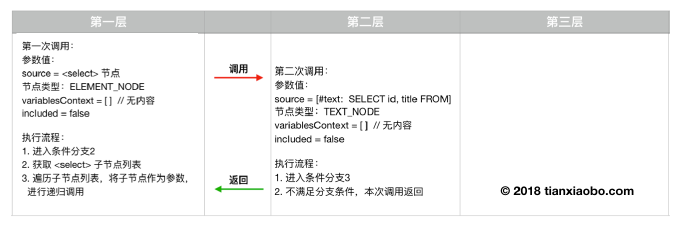
那么调用的入口代码清单3.20第34行includeParser.applyIncludes(context.getNode());传入的XNode显然是<select>节点。它会进入第二个条件,遍历自己的3个孩子节点。第一个节点和第二个节点的调用栈如下图
<selectKey>节点对于一些不支持自增主键的数据库来说,我们在插入数据时,需要明确指定主键数据。例如
1 2 3 4 5 6 7 8 9 10 <insert id ="saveAuthor" > <selectKey keyProperty ="id" resultType ="int" order ="BEFORE" > select author_seq.nextval from dual </selectKey > insert into Author (id, name, password) values (#{id}, #{username}, #{password}) </insert >
这部分的源码就不展开解析了。当Mybatis完成解析后,也会将<selectKey>节点从XNODE树中去掉
SqlSource经过上两节的解析,MyBatis已经把<select|insert|delete|create>中所有的<include>和<selectKey>子孙节点全部都替换并删除掉了。现在XNODE树中只有<if>、<where>等普通的ELEMENT节点和文本节点。这一步,我们将分析MyBatis是如何解析<select|insert|delete|create>节点的XNODE树,来生成SqlSource。当处理用户的实际调用时,MyBatis将通过SqlSource来解析出具体的SQL语句。
我们从代码清单3.20 的70行SqlSource sqlSource = langDriver.createSqlSource(configuration, context, parameterTypeClass);继续向下。
1 2 3 4 5 6 7 8 9 10 11 12 13 public SqlSource createSqlSource ( Configuration configuration, XNode script, Class<?> parameterType) XMLScriptBuilder builder = new XMLScriptBuilder(configuration, script, parameterType); return builder.parseScriptNode(); }
这个方法,只是通过调用XMLScriptBuilder的parseScriptNode()来实现生成SqlSource的具体逻辑而已,因此我们继续向下
1 2 3 4 5 6 7 8 9 10 11 12 13 14 15 16 17 18 19 public SqlSource parseScriptNode () MixedSqlNode rootSqlNode = parseDynamicTags(context); SqlSource sqlSource; if (isDynamic) { sqlSource = new DynamicSqlSource(configuration, rootSqlNode); } else { sqlSource = new RawSqlSource(configuration, rootSqlNode, parameterType); } return sqlSource; }
这里首先解释一下什么是动态SQL什么是静态SQL,动态SQL指的包含${}占位符或者<if>、<where>等动态语句节点的SQL。注意:只包含#{}并不算动态SQL。
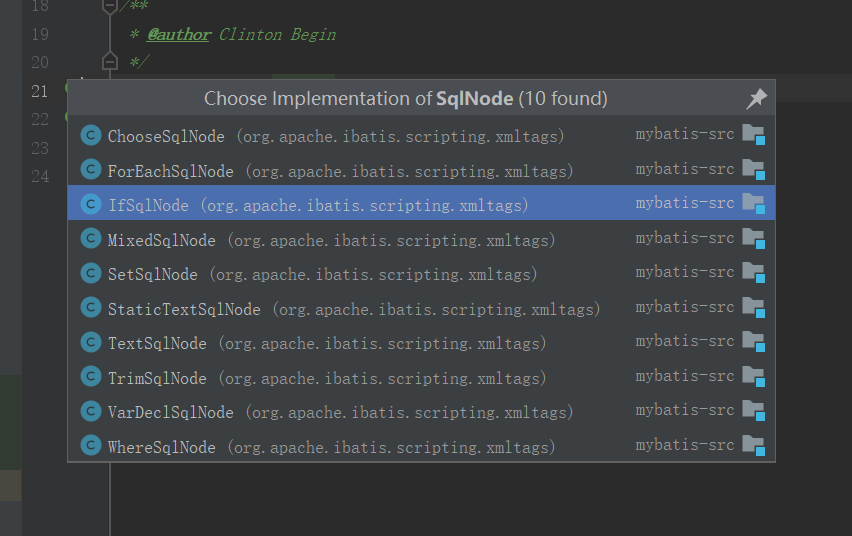
在继续分析主要逻辑之前,我们先看看MixSqlNode是什么。对于每个XNODE片段,在经过解析后都会变成一个SqlNode节点,比如TEXT节点将被解析为一个StaticTextSqlNode,而<if>节点将被解析为一个IfSqlNode。比较特殊的是MixSqlNode,它存储一个SqlNode类型的列表。类图如下面两张图。
在大致了解了SqlNode之后,我们从代码清单3.24的第7行继续向下,看看<select|insert|delete|update>这个XNode是怎么被解析为一个MixedSqlNode的。下面源码的逻辑如下
遍历<select|insert|delete|update>节点的所有子节点
如果子节点是TEXT类型的,则根据是动态还是静态,解析TextSqlNode或者StaticTextSqlNode,并将解析结果放入contents列表
如果子节点是ELEMENT类型的,那么根据标签名称来选取合适的NodeHandler解析,解析结果也会被放入contents列表
最后通过第2步和第3步得到的contents列表,生成一个MixedSqlNode,并作为SqlNode树的根节点返回
1 2 3 4 5 6 7 8 9 10 11 12 13 14 15 16 17 18 19 20 21 22 23 24 25 26 27 28 29 30 31 32 33 34 35 36 37 38 39 40 41 42 43 44 45 46 47 48 49 50 51 52 53 54 55 56 57 58 59 60 61 62 63 protected MixedSqlNode parseDynamicTags (XNode node) List<SqlNode> contents = new ArrayList<>(); NodeList children = node.getNode().getChildNodes(); for (int i = 0 ; i < children.getLength(); i++) { XNode child = node.newXNode(children.item(i)); if (child.getNode().getNodeType() == Node.CDATA_SECTION_NODE || child.getNode().getNodeType() == Node.TEXT_NODE) { String data = child.getStringBody("" ); TextSqlNode textSqlNode = new TextSqlNode(data); if (textSqlNode.isDynamic()) { contents.add(textSqlNode); isDynamic = true ; } else { contents.add(new StaticTextSqlNode(data)); } } else if (child.getNode().getNodeType() == Node.ELEMENT_NODE) { String nodeName = child.getNode().getNodeName(); NodeHandler handler = nodeHandlerMap.get(nodeName); if (handler == null ) { throw new BuilderException("Unknown element <" + nodeName + "> in SQL statement." ); } handler.handleNode(child, contents); isDynamic = true ; } } return new MixedSqlNode(contents); }
然后我们从上面代码清单的53行handler.handleNode(child, contents);向下,以一个If类型的NodeHandler为例,看看ELEMENT节点是怎么被解析的。
1 2 3 4 5 6 7 8 9 10 11 12 13 14 15 16 17 18 19 20 21 22 23 private class IfHandler implements NodeHandler public IfHandler () } @Override public void handleNode (XNode nodeToHandle, List<SqlNode> targetContents) MixedSqlNode mixedSqlNode = parseDynamicTags(nodeToHandle); String test = nodeToHandle.getStringAttribute("test" ); IfSqlNode ifSqlNode = new IfSqlNode(mixedSqlNode, test); targetContents.add(ifSqlNode); } }
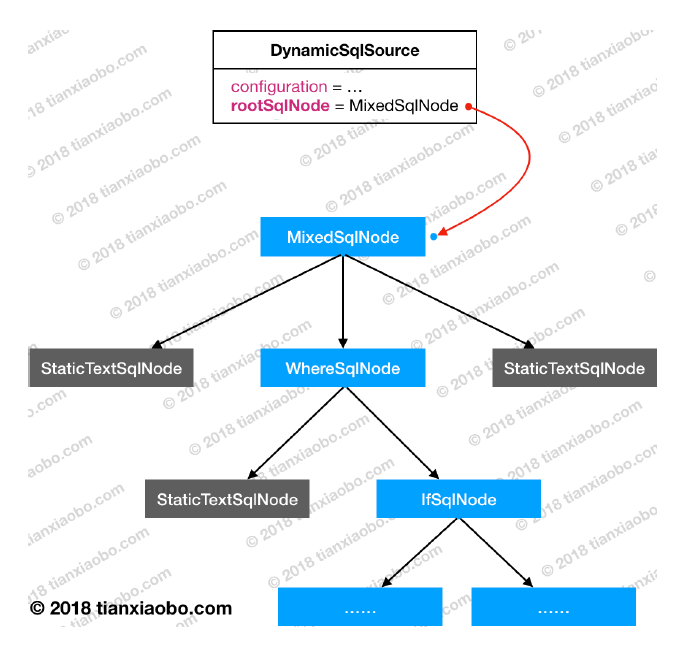
简单来说,就是对于<select|create|insert|delete>节点来说,它们的所有子节点内容将被解析为一棵节点类型为SqlNode的树,例如下图:这棵树储存在MappedStatement.SqlSource.rootSqlNode中,当运行时,用户调用传入具体参数,MyBatis就可以通过这棵树来生成具体的SQL语句了。至此,我们详细了解了SqlSource的生成过程,以及SqlSource的某些内部存储方式。
MappedStatement接着,我们从代码清单3.20的93行builderAssistant.addMappedStatement(xxx)向下,看一下存储SQL语句节点解析结果的MappedStatement是如何构建的。
1 2 3 4 5 6 7 8 9 10 11 12 13 14 15 16 17 18 19 20 21 22 23 24 25 26 27 28 29 30 31 32 33 34 35 36 37 38 39 40 41 42 43 44 45 46 47 48 49 50 51 52 53 54 55 56 57 58 59 60 61 62 63 64 65 66 67 68 69 70 public MappedStatement addMappedStatement ( String id, SqlSource sqlSource, StatementType statementType, SqlCommandType sqlCommandType, Integer fetchSize, Integer timeout, String parameterMap, Class<?> parameterType, String resultMap, Class<?> resultType, ResultSetType resultSetType, boolean flushCache, boolean useCache, boolean resultOrdered, KeyGenerator keyGenerator, String keyProperty, String keyColumn, String databaseId, LanguageDriver lang, String resultSets) if (unresolvedCacheRef) { throw new IncompleteElementException("Cache-ref not yet resolved" ); } id = applyCurrentNamespace(id, false ); boolean isSelect = sqlCommandType == SqlCommandType.SELECT; MappedStatement.Builder statementBuilder = new MappedStatement.Builder(configuration, id, sqlSource, sqlCommandType) .resource(resource) .fetchSize(fetchSize) .timeout(timeout) .statementType(statementType) .keyGenerator(keyGenerator) .keyProperty(keyProperty) .keyColumn(keyColumn) .databaseId(databaseId) .lang(lang) .resultOrdered(resultOrdered) .resultSets(resultSets) .resultMaps(getStatementResultMaps(resultMap, resultType, id)) .resultSetType(resultSetType) .flushCacheRequired(valueOrDefault(flushCache, !isSelect)) .useCache(valueOrDefault(useCache, isSelect)) .cache(currentCache); ParameterMap statementParameterMap = getStatementParameterMap(parameterMap, parameterType, id); if (statementParameterMap != null ) { statementBuilder.parameterMap(statementParameterMap); } MappedStatement statement = statementBuilder.build(); configuration.addMappedStatement(statement); return statement; }
下面总结下本大节的内容。本节主要完成<select|insert|delete|update>节点的解析工作。每一个这类型节点通过解析后都会生成一个MappedStatement实例,储存具体的信息。对于它的<inculde>和<selectKey>子节点,将被解析替换为正常的SQL节点。然后在完成了替换后<inculde>和<selectKey>子节点将被从XNode树中删除。这之后,会解析这个干净的XNode树,每个具体的SQL语句节点将被转义并存储到可以一颗SqlNode类型的树中,在运行时,我们通过解析这棵树将获取具体的SQL语句。然后,我们把MappedStatement节点存储到Configuration中。一个<select|insert|delete|update>节点的解析工作就完成了。
当我们完成 了<mapper>文件的解析后,还需要通过绑定,将<mapper>文件中的每个SQL语句节点与java代码中对应mapper接口的对应方法绑定起来,存放到Configuration.MapperRegistry的Map<Class<?>, MapperProxyFactory<?>> knownMappers = new HashMap<>();中,它也一个Class对象为键,以MapperProxyFactory为值,这个工厂可以通过反射为给类型的mapper接口生成实例。
这部分也不展开解释了,假如可以看懂第4章的sql执行过程,这个绑定过程也不在话下。
下面的代码是从代码清单3.1的17行bindMapperForNamespace();向下,完成具体的绑定过程。
1 2 3 4 5 6 7 8 9 10 11 12 13 14 15 16 17 18 19 20 21 22 23 24 25 26 27 28 29 30 private void bindMapperForNamespace () String namespace = builderAssistant.getCurrentNamespace(); if (namespace != null ) { Class<?> boundType = null ; try { boundType = Resources.classForName(namespace); } catch (ClassNotFoundException e) { } if (boundType != null ) { if (!configuration.hasMapper(boundType)) { configuration.addLoadedResource("namespace:" + namespace); configuration.addMapper(boundType); } } } }
接下来,我们从上述代码清单的26行configuration.addMapper(boundType);向下
1 2 3 4 5 6 7 8 9 10 11 12 13 14 15 16 17 18 19 20 21 22 23 24 25 26 27 28 29 30 31 public <T> void addMapper (Class<T> type) if (type.isInterface()) { if (hasMapper(type)) { throw new BindingException("Type " + type + " is already known to the MapperRegistry." ); } boolean loadCompleted = false ; try { knownMappers.put(type, new MapperProxyFactory<>(type)); MapperAnnotationBuilder parser = new MapperAnnotationBuilder(config, type); parser.parse(); loadCompleted = true ; } finally { if (!loadCompleted) { knownMappers.remove(type); } } } }