通过前两章对配置文件和映射文件的解析,现在MyBatis已经进入了就绪状态,就等着使用者发号施令了。本章将对MyBatis执行SQL的过程进行详尽的分析,将包括如下技术点的1、2、6。剩余的技术点将在下面的章节展开。
为mapper接口生成实现类
根据配置信息生成SQL,并将运行时参数设置到SQL中
一、二级缓存的实现
插件机制
数据库连接的获取与管理
查询结果的处理,以及延迟加载
在使用MyBatis操作数据库的时候,我们通常会先调用SqlSession接口的getMapper方法为我们的Mapper接口生成实现类(代码清单4.1第10行)。然后就可以通过Mapper进行数据库操作(代码清单4.1第14行)
1 2 3 4 5 6 7 8 9 10 11 12 13 14 15 16 17 18 public class MyApp public static void main (String[] args) throws IOException Logger logger = Logger.getLogger(MyApp.class); InputStream inputStream = Resources.getResourceAsStream("mybatis.xml" ); SqlSessionFactory sqlSessionFactory = new SqlSessionFactoryBuilder().build(inputStream); SqlSession sqlSession = sqlSessionFactory.openSession(); ProductDao productDao = sqlSession.getMapper(ProductDao.class); Product product= productDao.getProduct(12 ); logger.info(product); } }
我们首先跟随代码清单4.1第10行的调用栈向下,看看getMapper的具体实现方式
1 2 3 4 5 6 7 8 9 10 11 12 13 14 15 16 17 18 19 20 21 22 23 24 25 26 27 28 29 30 31 32 33 34 35 36 @Override public <T> T getMapper (Class<T> type) { return configuration.getMapper(type, this ); } public <T> T getMapper (Class<T> type, SqlSession sqlSession) { return mapperRegistry.getMapper(type, sqlSession); } public <T> T getMapper (Class<T> type, SqlSession sqlSession) { final MapperProxyFactory<T> mapperProxyFactory = (MapperProxyFactory<T>) knownMappers.get(type); if (mapperProxyFactory == null ) { throw new BindingException("Type " + type + " is not known to the MapperRegistry." ); } try { return mapperProxyFactory.newInstance(sqlSession); } catch (Exception e) { throw new BindingException("Error getting mapper instance. Cause: " + e, e); } }
上面代码清单的三层调用都非常简单,最后Mapper的创建,还是第32行的return mapperProxyFactory.newInstance(sqlSession);负责的。我们继续展开这个方法
1 2 3 4 5 6 7 8 9 10 11 12 13 14 15 16 17 18 19 20 21 22 23 24 25 public T newInstance (SqlSession sqlSession) final MapperProxy<T> mapperProxy = new MapperProxy<>(sqlSession, mapperInterface, methodCache); return newInstance(mapperProxy); } protected T newInstance (MapperProxy<T> mapperProxy) return (T) Proxy.newProxyInstance( mapperInterface.getClassLoader(), new Class[] { mapperInterface }, mapperProxy); }
这里说一下Proxy.newProxyInstance()方法介绍。Proxy类的newInstance()方法有三个参数:
ClassLoader loader:它是类加载器类型,你不用去理睬它,你只需要知道怎么可以获得它就可以了:MyInterface.class.getClassLoader()就可以获取到ClassLoader对象,没错,只要你有一个Class对象就可以获取到ClassLoader对象;Class[] interfaces:指定newProxyInstance()方法返回的对象要实现哪些接口,没错,可以指定多个接口,例如上面例子只我们只指定了一个接口:Class[] cs = {MyInterface.class};InvocationHandler handler:它是最重要的一个参数!它是一个接口!它的名字叫调用处理器!无论你调用代理对象的什么方法,它都是在调用InvocationHandler的invoke()方法。
通过上一小节的分析,我们知道,实际调用代理对象的方法时,执行逻辑由MapperProxy的invoke()负责。继续分析这个invoke()方法
1 2 3 4 5 6 7 8 9 10 11 12 13 14 15 16 17 18 19 20 public Object invoke (Object proxy, Method method, Object[] args) throws Throwable try { if (Object.class.equals(method.getDeclaringClass())) { return method.invoke(this , args); } else if (isDefaultMethod(method)) { return invokeDefaultMethod(proxy, method, args); } } catch (Throwable t) { throw ExceptionUtil.unwrapThrowable(t); } final MapperMethod mapperMethod = cachedMapperMethod(method); return mapperMethod.execute(sqlSession, args); }
其实这个方法的主逻辑也很简单,首先从缓存中查询MapperMethod,如果找不到就创建一个并放入缓存。然后调用这个MapperMethod的execute方法执行实际的逻辑。
在4.1.2.1小节,我们首先会从代码清单4.4的16行展开,看看MapperMethod这个对象都存储了哪些数据,有什么功能。然后,在4.1.2.2小节,我们将从代码清单4.4的19行向下,详细分析mapperMethod.execute()方法
MappedMethod对象代码清单4.4的16行查找了一个缓存,这个缓存结构其实是Map<Method, MapperMethod> methodCache;,键是一个Method,而值为MapperMethod(没错,它又出现了,我们后面会分析它)。下面我们展开这个方法看看。
1 2 3 4 5 6 private MapperMethod cachedMapperMethod (Method method) return methodCache.computeIfAbsent(method, k -> new MapperMethod(mapperInterface, method, sqlSession.getConfiguration())); }
这个方法非常简单,其实调用的是java类库的Map.computeIfAbsent。Map.computeIfAbsent首先判断缓存Map中是否存在指定key的值,如果不存在,会自动调用mappingFunction(key)计算key的value,然后将key = value放入到缓存Map。
那接下来,我们好好看看前面一直提到的MapperMethod都存储哪些信息吧。它主要就只有两个成员变量:
SqlCommand主要存储和SQL有关的各种信息。通过SqlCommand我们可以找到对应的MappedStatement(详见第三章,每个MappedStatement都是对每个SQL语句节点解析的结果)。详见代码清单4.7MethodSignature就是方法签名,它主要存储和目标方法相关的信息。包括返回值、参数列表这些。详见代码清单4.8
1 2 3 4 5 6 7 8 9 10 11 12 13 14 15 16 public class MapperMethod private final SqlCommand command; private final MethodSignature method; public MapperMethod (Class<?> mapperInterface, Method method, Configuration config) this .command = new SqlCommand(config, mapperInterface, method); this .method = new MethodSignature(config, mapperInterface, method); } }
SqlCommand对象如下:
1 2 3 4 5 6 7 8 9 10 11 12 13 14 15 16 17 18 19 20 21 22 23 24 25 26 27 28 29 30 31 32 33 34 35 36 public static class SqlCommand private final String name; private final SqlCommandType type; public SqlCommand (Configuration configuration, Class<?> mapperInterface, Method method) final String methodName = method.getName(); final Class<?> declaringClass = method.getDeclaringClass(); MappedStatement ms = resolveMappedStatement(mapperInterface, methodName, declaringClass, configuration); if (ms == null ) { if (method.getAnnotation(Flush.class) != null ) { name = null ; type = SqlCommandType.FLUSH; } else { throw new BindingException("Invalid bound statement (not found): " + mapperInterface.getName() + "." + methodName); } } else { name = ms.getId(); type = ms.getSqlCommandType(); if (type == SqlCommandType.UNKNOWN) { throw new BindingException("Unknown execution method for: " + name); } } } }
MethodSignature对象如下:
1 2 3 4 5 6 7 8 9 10 11 12 13 14 15 16 17 18 19 20 21 22 23 24 25 26 27 28 29 30 31 32 33 34 35 36 37 38 39 40 41 42 43 44 45 46 47 48 49 50 51 52 53 54 55 56 57 58 59 60 61 62 63 64 65 66 67 68 69 70 71 72 73 74 75 76 public static class MethodSignature private final boolean returnsMany; private final boolean returnsMap; private final boolean returnsVoid; private final boolean returnsCursor; private final boolean returnsOptional; private final Class<?> returnType; private final String mapKey; private final Integer resultHandlerIndex; private final Integer rowBoundsIndex; private final ParamNameResolver paramNameResolver; public MethodSignature (Configuration configuration, Class<?> mapperInterface, Method method) Type resolvedReturnType = TypeParameterResolver.resolveReturnType(method, mapperInterface); if (resolvedReturnType instanceof Class<?>) { this .returnType = (Class<?>) resolvedReturnType; } else if (resolvedReturnType instanceof ParameterizedType) { this .returnType = (Class<?>) ((ParameterizedType) resolvedReturnType).getRawType(); } else { this .returnType = method.getReturnType(); } this .returnsVoid = void .class.equals(this .returnType); this .returnsMany = configuration.getObjectFactory().isCollection(this .returnType) || this .returnType.isArray(); this .returnsCursor = Cursor.class.equals(this .returnType); this .returnsOptional = Optional.class.equals(this .returnType); this .mapKey = getMapKey(method); this .returnsMap = this .mapKey != null ; this .rowBoundsIndex = getUniqueParamIndex(method, RowBounds.class); this .resultHandlerIndex = getUniqueParamIndex(method, ResultHandler.class); this .paramNameResolver = new ParamNameResolver(configuration, method); } }
然后我们从代码清单4.8的74行向下,看看ParamNameResolver具体是怎么进行参数解析的
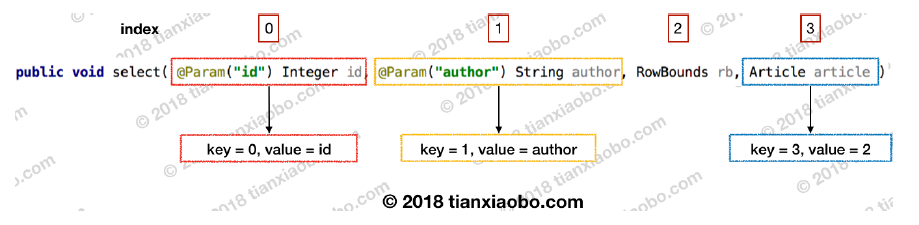
1 2 3 4 5 6 7 8 9 10 11 12 13 14 15 16 17 18 19 20 21 22 23 24 25 26 27 28 29 30 31 32 33 34 35 36 37 38 39 40 41 42 43 44 45 46 47 48 49 50 51 52 53 54 55 56 57 58 59 60 61 62 63 64 private final SortedMap<Integer, String> names;private boolean hasParamAnnotation;public ParamNameResolver (Configuration config, Method method) final Class<?>[] paramTypes = method.getParameterTypes(); final Annotation[][] paramAnnotations = method.getParameterAnnotations(); final SortedMap<Integer, String> map = new TreeMap<>(); int paramCount = paramAnnotations.length; for (int paramIndex = 0 ; paramIndex < paramCount; paramIndex++) { if (isSpecialParameter(paramTypes[paramIndex])) { continue ; } String name = null ; for (Annotation annotation : paramAnnotations[paramIndex]) { if (annotation instanceof Param) { hasParamAnnotation = true ; name = ((Param) annotation).value(); break ; } } if (name == null ) { if (config.isUseActualParamName()) { name = getActualParamName(method, paramIndex); } if (name == null ) { name = String.valueOf(map.size()); } } map.put(paramIndex, name); } names = Collections.unmodifiableSortedMap(map); }
这个方法其实就是解析方法的每个参数,如果使用了@Param,就设置这个注解的值为参数名,否则就用参数的index(一个数字)作为名称。
下面我们举一个简单的例子。看看select方法的参数列表将被怎么解析
1 2 3 4 5 public interface ArticleMapper public void select (@Param("id" ) Integer id,@Param ("author" ) String author, RowBounds rb, Article article) {}}
execute方法书接代码清单4.4的19行return mapperMethod.execute(sqlSession, args);,我们来看看Mapper代理是如何执行具体逻辑的吧。其实这个方法主要根据不同的SQL类型,分派不同的逻辑,然后调用SqlSession中的具体方法
1 2 3 4 5 6 7 8 9 10 11 12 13 14 15 16 17 18 19 20 21 22 23 24 25 26 27 28 29 30 31 32 33 34 35 36 37 38 39 40 41 42 43 44 45 46 47 48 49 50 51 52 53 54 55 56 57 58 59 60 61 62 63 64 65 66 67 68 69 70 71 72 73 74 75 76 77 78 79 80 81 82 public Object execute (SqlSession sqlSession, Object[] args) Object result; switch (command.getType()) { case INSERT: { Object param = method.convertArgsToSqlCommandParam(args); result = rowCountResult(sqlSession.insert(command.getName(), param)); break ; } case UPDATE: { Object param = method.convertArgsToSqlCommandParam(args); result = rowCountResult(sqlSession.update(command.getName(), param)); break ; } case DELETE: { Object param = method.convertArgsToSqlCommandParam(args); result = rowCountResult(sqlSession.delete(command.getName(), param)); break ; } case SELECT: if (method.returnsVoid() && method.hasResultHandler()) { executeWithResultHandler(sqlSession, args); result = null ; } else if (method.returnsMany()) { result = executeForMany(sqlSession, args); } else if (method.returnsMap()) { result = executeForMap(sqlSession, args); } else if (method.returnsCursor()) { result = executeForCursor(sqlSession, args); } else { Object param = method.convertArgsToSqlCommandParam(args); result = sqlSession.selectOne(command.getName(), param); if (method.returnsOptional() && (result == null || !method.getReturnType().equals(result.getClass()))) { result = Optional.ofNullable(result); } } break ; case FLUSH: result = sqlSession.flushStatements(); break ; default : throw new BindingException("Unknown execution method for: " + command.getName()); } if (result == null && method.getReturnType().isPrimitive() && !method.returnsVoid()) { throw new BindingException("Mapper method '" + command.getName() + " attempted to return null from a method with a primitive return type (" + method.getReturnType() + ")." ); } return result; }
代码清单4.11中,rowCoundResule经常出现,它其实就是根据方法签名里的返回值,为Insert|Delete|Update等操作返回不同的返回值,代码如下
1 2 3 4 5 6 7 8 9 10 11 12 13 14 15 16 17 18 19 20 21 22 23 24 25 26 27 28 29 30 31 32 33 34 private Object rowCountResult (int rowCount) final Object result; if (method.returnsVoid()) { result = null ; } else if (Integer.class.equals(method.getReturnType()) || Integer.TYPE.equals(method.getReturnType())) { result = rowCount; } else if (Long.class.equals(method.getReturnType()) || Long.TYPE.equals(method.getReturnType())) { result = (long )rowCount; } else if (Boolean.class.equals(method.getReturnType()) || Boolean.TYPE.equals(method.getReturnType())) { result = rowCount > 0 ; } else { throw new BindingException("Mapper method '" + command.getName() + "' has an unsupported return type: " + method.getReturnType()); } return result; }
在分析查询语句的执行流程之前,我们不妨先看一看。代码清单4.11的第49行Object param = method.convertArgsToSqlCommandParam(args);。回顾一下这一章前面介绍的MappedMethod.MethodSigniture.ParamNameResolver其中就存储了参数索引与参数名的映射:private final SortedMap<Integer, String> names;。所以我们现在要根据手头的参数索引与参数名映射,以及传入的参数列表,解析出一份参数名与参数值之间的映射。如代码片段4.12所示
1 2 3 4 5 6 7 8 9 10 11 12 13 14 15 16 17 18 19 20 21 22 23 24 25 26 27 28 29 30 31 32 33 34 35 36 37 38 39 40 41 42 43 44 45 46 47 48 49 50 51 52 public Object convertArgsToSqlCommandParam (Object[] args) return paramNameResolver.getNamedParams(args); } public Object getNamedParams (Object[] args) final int paramCount = names.size(); if (args == null || paramCount == 0 ) { return null ; } else if (!hasParamAnnotation && paramCount == 1 ) { return args[names.firstKey()]; } else { final Map<String, Object> param = new ParamMap<>(); int i = 0 ; for (Map.Entry<Integer, String> entry : names.entrySet()) { param.put(entry.getValue(), args[entry.getKey()]); final String genericParamName = GENERIC_NAME_PREFIX + String.valueOf(i + 1 ); if (!names.containsValue(genericParamName)) { param.put(genericParamName, args[entry.getKey()]); } i++; } return param; } }
接下来,我们仔细展开一种selectOne方法的调用栈,直到调用栈深至JDBC为止,看看MyBatis一共封了多长层,每一层分别完成什么逻辑。
首先是第一层:SqlSession层。它的上一层只会返回List,而这一层则对返回结果的类型进一步细分为selectOne、selectList、selectCursor等。下面我们从代码清单4.11,SELECT分支的第50行,result = sqlSession.selectOne(command.getName(), param);。向下,看看这个selectOne方法的内容。
1 2 3 4 5 6 7 8 9 10 11 12 13 14 15 16 public <T> T selectOne (String statement, Object parameter) { List<T> list = this .selectList(statement, parameter); if (list.size() == 1 ) { return list.get(0 ); } else if (list.size() > 1 ) { throw new TooManyResultsException("Expected one result (or null) to" + "be returned by selectOne(), but found: " + list.size()); } else { return null ; } }
这个selectOne方法其实只是简单的调用this.selectList(statement, parameter);而已。然后取出返回的List中的唯一一个元素,返回。
下面我们继续往下走,再看看selectList都完成了哪些逻辑。
1 2 3 4 5 6 7 8 9 10 11 12 13 14 15 16 17 18 19 20 21 22 23 24 25 26 27 28 public <E> List<E> selectList (String statement, Object parameter) { return this .selectList(statement, parameter, RowBounds.DEFAULT); } @Override public <E> List<E> selectList (String statement, Object parameter, RowBounds rowBounds) { try { MappedStatement ms = configuration.getMappedStatement(statement); return executor.query(ms, wrapCollection(parameter), rowBounds, Executor.NO_RESULT_HANDLER); } catch (Exception e) { throw ExceptionFactory.wrapException("Error querying database. Cause: " + e, e); } finally { ErrorContext.instance().reset(); } }
第一层SqlSession层的逻辑到这里就结束啦,我们下面再来看看第二层Executor层都完成了哪些逻辑。
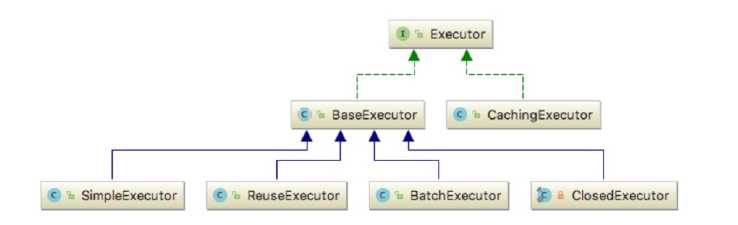
首先,展示Executor部分的类设计,它采用了装饰器模式
顶层接口是Executor,它定义了诸如查询、更新、提交、回滚等操作
BaseExector是一个抽象类,它为它的4个子类实现了一些公共的处理逻辑,并且把特殊的处理逻辑设置为了抽象方法,交给子类实现SimpleExecutor是最常用的一个Executor默认情况下,Executor的类型为CachingExecutor,该类是一个装饰器类,用于给目标Executor增加二级缓存。这个装饰器通常情况下修饰的是SimpleExecutor
接着我们打开CachingExecutor和SimpleExecutor的query方法来看看具体逻辑
1 2 3 4 5 6 7 8 9 10 11 12 13 14 15 16 17 18 19 20 21 22 23 24 25 26 27 28 29 30 31 32 33 34 35 36 37 38 39 40 41 42 43 44 45 46 47 48 49 50 51 52 53 54 55 56 57 58 59 60 61 public <E> List<E> query ( MappedStatement ms, Object parameterObject, RowBounds rowBounds, ResultHandler resultHandler, CacheKey key, BoundSql boundSql) throws SQLException Cache cache = ms.getCache(); if (cache != null ) { flushCacheIfRequired(ms); if (ms.isUseCache() && resultHandler == null ) { ensureNoOutParams(ms, boundSql); @SuppressWarnings ("unchecked" ) List<E> list = (List<E>) tcm.getObject(cache, key); if (list == null ) { list = delegate.query(ms, parameterObject, rowBounds, resultHandler, key, boundSql); tcm.putObject(cache, key, list); } return list; } } return delegate.query(ms, parameterObject, rowBounds, resultHandler, key, boundSql); }
从上可以看到,CacheExecutor主要通过事务缓存管理器(TransactionCacheManager),来完成缓存功能。对于这个类的分析将留在第6章。
那么接下来我们从代码清单4.15的55行return delegate.query(ms,parameterObject,rowBounds,resultHandler,key,boundSql);向下,看看被装饰者的query都执行了哪些逻辑
1 2 3 4 5 6 7 8 9 10 11 12 13 14 15 16 17 18 19 20 21 22 23 24 25 26 27 28 29 30 31 32 33 34 35 36 37 38 39 40 41 42 43 44 45 46 47 48 49 50 51 52 53 54 55 56 57 58 59 60 61 62 @Override public <E> List<E> query (MappedStatement ms, Object parameter, RowBounds rowBounds, ResultHandler resultHandler, CacheKey key, BoundSql boundSql) throws SQLException ErrorContext.instance().resource(ms.getResource()) .activity("executing a query" ).object(ms.getId()); if (closed) { throw new ExecutorException("Executor was closed." ); } if (queryStack == 0 && ms.isFlushCacheRequired()) { clearLocalCache(); } List<E> list; try { queryStack++; list = resultHandler == null ? (List<E>) localCache.getObject(key) : null ; if (list != null ) { handleLocallyCachedOutputParameters(ms, key, parameter, boundSql); } else { list = queryFromDatabase(ms, parameter, rowBounds, resultHandler, key, boundSql); } } finally { queryStack--; } if (queryStack == 0 ) { for (DeferredLoad deferredLoad : deferredLoads) { deferredLoad.load(); } deferredLoads.clear(); if (configuration.getLocalCacheScope() == LocalCacheScope.STATEMENT) { clearLocalCache(); } } return list; }
简单来说,这个方法会查询一级缓存,如果未命中,再向数据库进行查询。此外,这个方法还用于处理延迟加载的相关操作。
那我们继续从代码段4.16的38行queryFromDatabase向下,看看具体的数据库查询逻辑
1 2 3 4 5 6 7 8 9 10 11 12 13 14 15 16 17 18 19 20 21 22 23 24 25 26 27 28 29 30 31 32 private <E> List<E> queryFromDatabase (MappedStatement ms, Object parameter, RowBounds rowBounds, ResultHandler resultHandler, CacheKey key, BoundSql boundSql) throws SQLException List<E> list; localCache.putObject(key, EXECUTION_PLACEHOLDER); try { list = doQuery(ms, parameter, rowBounds, resultHandler, boundSql); } finally { localCache.removeObject(key); } localCache.putObject(key, list); if (ms.getStatementType() == StatementType.CALLABLE) { localOutputParameterCache.putObject(key, parameter); } return list; }
接着,我们从代码清单4.17的第18行向下list = doQuery(ms, parameter, rowBounds, resultHandler, boundSql);。以SimpleExecutor为例,看看子类是具体怎么执行doQuery的
1 2 3 4 5 6 7 8 9 10 11 12 13 14 15 16 17 18 19 20 21 22 23 24 25 26 27 28 29 30 public <E> List<E> doQuery (MappedStatement ms, Object parameter, RowBounds rowBounds, ResultHandler resultHandler, BoundSql boundSql) throws SQLException Statement stmt = null ; try { Configuration configuration = ms.getConfiguration(); StatementHandler handler = configuration.newStatementHandler(wrapper, ms, parameter, rowBounds, resultHandler, boundSql); stmt = prepareStatement(handler, ms.getStatementLog()); return handler.query(stmt, resultHandler); } finally { closeStatement(stmt); } }
从这个方法的第26行开始,我们正式从第二层(Executor)进入了第三层(StatementHandler)。这一层主要与JDBC交互,完成各种对数据库的操作。我们从return handler.query(stmt, resultHandler);向下,看看handler的query都干了什么。
1 2 3 4 5 6 7 8 9 10 11 12 13 @Override public <E> List<E> query (Statement statement, ResultHandler resultHandler) throws SQLException String sql = boundSql.getSql(); statement.execute(sql); return resultSetHandler.handleResultSets(statement); }
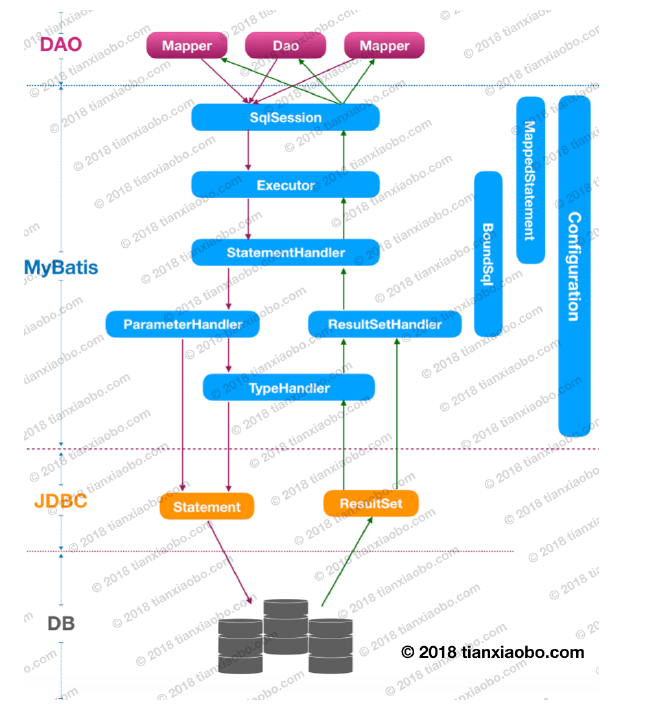
这就是selectOne方法的全程,它分别经历了第一层SqlSession,第二层Executor和第三层StatementHandler。然后通过第三层,调用JDBC来执行具体的数据库操作。这就是主干设计,如下图。
但是除此之外还有很多重要的方法调用,例如代码清单4.19的boundSql。所以接下来的五个小节,我们讲补充这些枝干内容,以获取更深入的理解。
4.2.2 将详细介绍如何将SQL语句完整的解析出来
4.2.3 将介绍StatementHandler层的相关内容
4.2.4 将介绍我们如何设置运行时参数给Statement
4.2.5 将介绍对#{}的解析
4.26 将介绍如何处理查询结果,将ResultSet解析成各种不同的类型
先看看BoundSql的成员变量
1 2 3 4 5 6 7 8 9 10 11 12 public class BoundSql private final String sql; private final List<ParameterMapping> parameterMappings; private final Object parameterObject; private final Map<String, Object> additionalParameters; private final MetaObject metaParameters; }
变量名
类型
用途
sqlString一个完整的SQL语句,包含问号?占位符
parameterMappingsList保存每个#{}占位符代表参数的基本信息,包括:javaType、jdbcType、名称等
parameterObjectObject用户在运行时传入的具体参数值
additionnalParametersMap附加参数,用来存储一些额外信息,比如databaseId等
metaParametersMetaObjectaddtionalParameters的元信息对象
我们知道,要执行的Sql的最终解析信息都存储在了SqlSource中,那么我们看看如何获取这个BoundSql
1 2 3 4 5 6 7 8 9 10 11 12 13 14 15 16 17 18 19 20 21 22 23 24 25 26 27 28 29 30 31 public BoundSql getBoundSql (Object parameterObject) BoundSql boundSql = sqlSource.getBoundSql(parameterObject); List<ParameterMapping> parameterMappings = boundSql.getParameterMappings(); if (parameterMappings == null || parameterMappings.isEmpty()) { boundSql = new BoundSql(configuration, boundSql.getSql(), parameterMap.getParameterMappings(), parameterObject); } for (ParameterMapping pm : boundSql.getParameterMappings()) { String rmId = pm.getResultMapId(); if (rmId != null ) { ResultMap rm = configuration.getResultMap(rmId); if (rm != null ) { hasNestedResultMaps |= rm.hasNestedResultMaps(); } } } return boundSql; }
其实就是简单的调用了SqlSource.getBoundSql,那我们继续向下
1 2 3 4 5 6 7 8 9 10 11 12 13 14 15 16 17 18 19 20 21 22 23 24 25 26 27 28 29 30 31 32 33 34 @Override public BoundSql getBoundSql (Object parameterObject) DynamicContext context = new DynamicContext(configuration, parameterObject); rootSqlNode.apply(context); SqlSourceBuilder sqlSourceParser = new SqlSourceBuilder(configuration); Class<?> parameterType = parameterObject == null ? Object.class : parameterObject.getClass(); SqlSource sqlSource = sqlSourceParser.parse( context.getSql(), parameterType, context.getBindings()); BoundSql boundSql = sqlSource.getBoundSql(parameterObject); context.getBindings().forEach(boundSql::setAdditionalParameter); return boundSql; }
上述方法主要分为五个步骤
创建DynamicContext作为构建BoundSql所需的上下文,它依次添加每个SqlNode节点的解析结果
解析SqlNode树,并将解析结果存储到DynamicContext中
构建一个StaticSqlSource,在此过程中将sql语句的占位符#{}替换为问号?,并且为每个占位符构建对应的ParameterMapping
调用StaticSqlSource的getBoundSql获取BoundSql
将DynamicContext的ContextMap中的内容拷贝给BoundSql
DynamicContext1 2 3 4 5 6 7 8 9 10 11 12 public class DynamicContext public static final String PARAMETER_OBJECT_KEY = "_parameter" ; public static final String DATABASE_ID_KEY = "_databaseId" ; private final ContextMap bindings; private final StringJoiner sqlBuilder = new StringJoiner(" " ); private int uniqueNumber = 0 ; }
sqIBuilder变量用于存放SQL片段的解析结果, bindings则用于存储一些额外的信息,比如运行时参数和 databased等。
DynamicContext对外提供了两个接口,appendSql用来加入Sql片段,getSql用来获取SQL
SQL片段根据第三章的知识,我们都知道SqlSource中存储了一颗SqlNode树,当调用时,我们解析这颗SqlNode树就可以生成需要的sql语句,并存放到DynamicContext中。
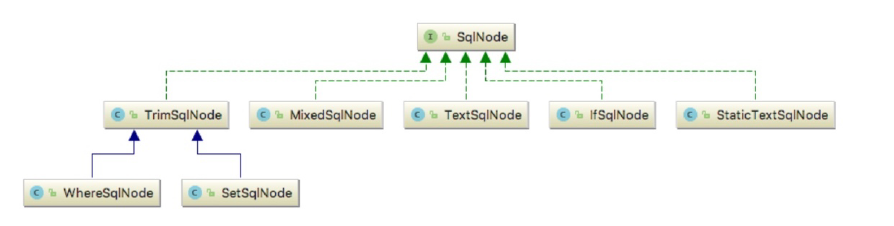
SqlNode是一个接口,它只有一个apply方法
1 2 3 4 5 6 public interface SqlNode boolean apply (DynamicContext context) }
这个接口有很多实现类,用来处理不同类型的Sql节点,如下图。
下面举几个SqlNode的apply的例子
MixSqlNode中保存了一个SqlNode类型的List,它的apply就是调用list中所有SqlNode的apply方法
1 2 3 4 5 6 7 8 9 private final List<SqlNode> contents;@Override public boolean apply (DynamicContext context) contents.forEach(node -> node.apply(context)); return true ; }
TextSqlNode负责保存带有${}的SQL片段,因此它的apply()还需要把${}给替换为运行时传入的参数,使其静态化。
1 2 3 4 5 6 7 public boolean apply (DynamicContext context) GenericTokenParser parser = createParser(new BindingTokenParser(context, injectionFilter)); context.appendSql(parser.parse(text)); return true ; }
下面举个例子,假设有一个TextSql段
1 SELECT * FROM article WHERE author = ${authorId}
经过TextSqlNode的apply()之后,它会变成下面所示
1 SELECT * FROM article WHERE author = "bili"
具体的查找和替换过程这里不展开,这里要说明的是,对于${}占位符,在生成SQL语句的这一步就完成了替换,这是很危险的,容易产生SQL注入。
#{}占位符经过前面的解析,我们已经能从DynamicContext获取到完整的SQL语句了。但这并不意味着解析过程就结束了,因为当前的SQL语句中还有一种占位符没有处理,即#{}。
它的入口在代码清单4.22的23行SqlSource sqlSource = sqlSourceParser.parse(context.getSql(), parameterType, context.getBindings());。当这一步完成后不仅会,而且会
1 2 3 4 5 6 7 8 9 10 11 12 13 14 15 16 17 18 public SqlSource parse (String originalSql, Class<?> parameterType, Map<String, Object> additionalParameters) ParameterMappingTokenHandler handler = new ParameterMappingTokenHandler(configuration, parameterType, additionalParameters); GenericTokenParser parser = new GenericTokenParser("#{" , "}" , handler); String sql = parser.parse(originalSql); return new StaticSqlSource(configuration, sql, handler.getParameterMappings()); }
1 2 3 4 5 6 7 8 9 10 11 12 13 14 15 16 17 18 19 20 21 22 23 24 25 26 27 28 29 30 31 32 33 34 35 36 37 38 39 40 41 42 43 44 45 46 47 48 49 50 51 52 53 54 55 56 57 58 59 60 61 62 63 64 65 66 67 68 69 70 71 72 73 74 75 76 77 78 79 80 81 82 83 84 85 86 87 88 89 90 91 92 93 94 95 96 97 98 99 100 public String parse (String text) if (text == null || text.isEmpty()) { return "" ; } int start = text.indexOf(openToken); if (start == -1 ) { return text; } char [] src = text.toCharArray(); int offset = 0 ; final StringBuilder builder = new StringBuilder(); StringBuilder expression = null ; while (start > -1 ) { if (start > 0 && src[start - 1 ] == '\\' ) { builder.append(src, offset, start - offset - 1 ).append(openToken); offset = start + openToken.length(); } else { if (expression == null ) { expression = new StringBuilder(); } else { expression.setLength(0 ); } builder.append(src, offset, start - offset); offset = start + openToken.length(); int end = text.indexOf(closeToken, offset); while (end > -1 ) { if (end > offset && src[end - 1 ] == '\\' ) { expression.append(src, offset, end - offset - 1 ) .append(closeToken); offset = end + closeToken.length(); end = text.indexOf(closeToken, offset); } else { expression.append(src, offset, end - offset); offset = end + closeToken.length(); break ; } } if (end == -1 ) { builder.append(src, start, src.length - start); offset = src.length; } else { builder.append(handler.handleToken(expression.toString())); offset = end + closeToken.length(); } } start = text.indexOf(openToken, offset); } if (offset < src.length) { builder.append(src, offset, src.length - offset); } return builder.toString(); }
接下来我们看看83行的handler.handleToken(expression.toString())具体对找到的expression做了什么操作。
1 2 3 4 5 6 7 8 9 10 11 12 13 14 15 16 17 18 19 20 21 22 23 24 25 26 27 28 29 30 31 32 33 34 35 36 37 38 39 40 41 42 43 44 45 46 47 48 49 50 51 52 53 54 55 56 57 58 59 60 61 62 63 64 65 66 67 68 69 70 71 72 73 74 75 76 77 78 private List<ParameterMapping> parameterMappings = new ArrayList<>();@Override public String handleToken (String content) parameterMappings.add(buildParameterMapping(content)); return "?" ; } private ParameterMapping buildParameterMapping (String content) Map<String, String> propertiesMap = parseParameterMapping(content); String property = propertiesMap.get("property" ); Class<?> propertyType; if (metaParameters.hasGetter(property)) { propertyType = metaParameters.getGetterType(property); } else if (typeHandlerRegistry.hasTypeHandler(parameterType)) { propertyType = parameterType; } else if (JdbcType.CURSOR.name().equals(propertiesMap.get("jdbcType" ))) { propertyType = java.sql.ResultSet.class; } else if (property == null || Map.class.isAssignableFrom(parameterType)) { propertyType = Object.class; } else { MetaClass metaClass = MetaClass.forClass(parameterType, configuration.getReflectorFactory()); if (metaClass.hasGetter(property)) { propertyType = metaClass.getGetterType(property); } else { propertyType = Object.class; } } ParameterMapping.Builder builder = new ParameterMapping.Builder(configuration, property, propertyType); Class<?> javaType = propertyType; String typeHandlerAlias = null ; for (Map.Entry<String, String> entry : propertiesMap.entrySet()) { String name = entry.getKey(); String value = entry.getValue(); if ("javaType" .equals(name)) { javaType = resolveClass(value); builder.javaType(javaType); } else if ("jdbcType" .equals(name)) { builder.jdbcType(resolveJdbcType(value)); } else if ("mode" .equals(name)) { builder.mode(resolveParameterMode(value)); } else if ("numericScale" .equals(name)) { builder.numericScale(Integer.valueOf(value)); } else if ("resultMap" .equals(name)) { builder.resultMapId(value); } else if ("typeHandler" .equals(name)) { typeHandlerAlias = value; } else if ("jdbcTypeName" .equals(name)) { builder.jdbcTypeName(value); } else if ("property" .equals(name)) { } else if ("expression" .equals(name)) { throw new BuilderException("Expression based parameters yet" ); } else { throw new BuilderException("An invalid property '" + name + "' was found in mapping #{" + content + "}. Valid properties are " + PARAMETER_PROPERTIES); } } if (typeHandlerAlias != null ) { builder.typeHandler(resolveTypeHandler(javaType, typeHandlerAlias)); } return builder.build(); }
通过了这一步的解析,Sql语句放入了DynamicContext和ParamterMappings放入了ParameterMappingTokenHandler,然后我们通过这些信息构建一个StaticSqlSource并返回即可,如代码清单4.27的17行return new StaticSqlSource(configuration, sql, handler.getParameterMappings());所示
至此,我们获取到了BoundSql,里面包含的SQL语句和形参列表再后面的步骤将会起到作用。
在MyBatis的源码中,StatementHandler是一个非常核心接口。之所以说它核心,是因为从代码分层的角度来说,StatementHandler是 MyBatis源码的边界,再往下层就是JDBC层面的接口了。StatementHandler需要和JDBC层面的接口打交道。
它要做的事情有很多。
在执行SQL之前,StatementHandler需要创建合适的 Statement对象,然后填充参数值到Statement对象中,最后通过 Statement对象执行SQL。
待SQL执行完毕,还要去处理查询结果等
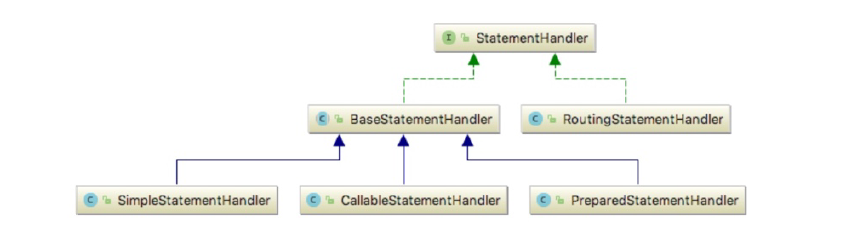
这些过程看似简单,但实现起来却很复杂。好在,这些过程对应的逻辑并不需要我们亲自实现。好了,其他的就不多说了。下面我们来看一下 StatementHandler的继承体系。
StatementHandler是一个接口,它定义了各种操作:prepare、batch、update、query等。BaseStatementHandler是一个抽象类,它实现了接口的一部分方法。它的三个子类,分别对应三种不同的Statement:Statement、CallableStatement、PreparedStatement。
而RoutingStatementHandler是一个装饰器,它会根据传入的MappedStatement中的statementType选用不同的handler进行处理。
接下来我们从代码清单4.18的第15行StatementHandler handler = configuration.newStatementHandler(wrapper, ms, parameter, rowBounds, resultHandler, boundSql);,来看看StatementHandler的具体创建过程。
1 2 3 4 5 6 7 8 9 10 11 12 13 14 15 16 17 18 19 20 21 22 23 24 public StatementHandler newStatementHandler (Executor executor, MappedStatement mappedStatement, Object parameterObject, RowBounds rowBounds, ResultHandler resultHandler, BoundSql boundSql) StatementHandler statementHandler = new RoutingStatementHandler(executor, mappedStatement, parameterObject, rowBounds, resultHandler, boundSql); statementHandler = (StatementHandler) interceptorChain.pluginAll(statementHandler); return statementHandler; }
1 2 3 4 5 6 7 8 9 10 11 12 13 14 15 16 17 18 19 20 21 22 23 24 25 26 27 28 29 30 31 32 33 34 35 36 37 38 39 40 41 42 public class RoutingStatementHandler implements StatementHandler private final StatementHandler delegate; public RoutingStatementHandler (Executor executor, MappedStatement ms, Object parameter, RowBounds rowBounds, ResultHandler resultHandler, BoundSql boundSql) switch (ms.getStatementType()) { case STATEMENT: delegate = new SimpleStatementHandler(executor, ms, parameter, rowBounds, resultHandler, boundSql); break ; case PREPARED: delegate = new PreparedStatementHandler(executor, ms, parameter, rowBounds, resultHandler, boundSql); break ; case CALLABLE: delegate = new CallableStatementHandler(executor, ms, parameter, rowBounds, resultHandler, boundSql); break ; default : throw new ExecutorException("Unknown statement type: " + ms.getStatementType()); } } @Override public <E> List<E> query (Statement statement, ResultHandler resultHandler) throws SQLException return delegate.query(statement, resultHandler); } }
RoutingStatementHandler的构造方法会根据MappedStatement中的statementType变量创建不同的 Statementhandler实现类。默认情况下,statementType值为PREPARED。关于StatementHandler创建的过程就先分析到这, StatementHandler创建完成了,后续要做到事情是创建 Statement,以及将运行时参数和 Statement进行绑定。
Statement并设置运行时参数本章将从4.18的23行stmt = prepareStatement(handler, ms.getStatementLog());向下,看看如何创建 Statement,以及如何将运行时参数和 Statement进行绑定。
1 2 3 4 5 6 7 8 9 10 11 private Statement prepareStatement (StatementHandler handler, Log statementLog) throws SQLException Statement stmt; Connection connection = getConnection(statementLog); stmt = handler.prepare(connection, transaction.getTimeout()); handler.parameterize(stmt); return stmt; }
1 2 3 4 5 6 7 8 9 10 11 12 13 14 15 16 17 18 19 20 21 22 23 24 25 26 27 28 29 public Statement prepare (Connection connection, Integer transactionTimeout) throws SQLException ErrorContext.instance().sql(boundSql.getSql()); Statement statement = null ; try { statement = instantiateStatement(connection); setStatementTimeout(statement, transactionTimeout); setFetchSize(statement); return statement; } catch (SQLException e) { closeStatement(statement); throw e; } catch (Exception e) { closeStatement(statement); throw new ExecutorException("Error preparing statement. Cause: " + e, e); } }
1 2 3 4 5 public void parameterize (Statement statement) throws SQLException parameterHandler.setParameters((PreparedStatement) statement); }
xx
1 2 3 4 5 6 7 8 9 10 11 12 13 14 15 16 17 18 19 20 21 22 23 24 25 26 27 28 29 30 31 32 33 34 35 36 37 38 39 40 41 42 43 44 45 46 47 48 49 50 51 52 53 54 55 56 57 58 59 60 61 62 63 public void setParameters (PreparedStatement ps) ErrorContext.instance().activity("setting parameters" ). object(mappedStatement.getParameterMap().getId()); List<ParameterMapping> parameterMappings = boundSql.getParameterMappings(); if (parameterMappings != null ) { for (int i = 0 ; i < parameterMappings.size(); i++) { ParameterMapping parameterMapping = parameterMappings.get(i); if (parameterMapping.getMode() != ParameterMode.OUT) { Object value; String propertyName = parameterMapping.getProperty(); if (boundSql.hasAdditionalParameter(propertyName)) { value = boundSql.getAdditionalParameter(propertyName); } else if (parameterObject == null ) { value = null ; } else if (typeHandlerRegistry. hasTypeHandler(parameterObject.getClass())) { value = parameterObject; } else { MetaObject metaObject = configuration.newMetaObject(parameterObject); value = metaObject.getValue(propertyName); } TypeHandler typeHandler = parameterMapping.getTypeHandler(); JdbcType jdbcType = parameterMapping.getJdbcType(); if (value == null && jdbcType == null ) { jdbcType = configuration.getJdbcTypeForNull(); } try { typeHandler.setParameter(ps, i + 1 , value, jdbcType); } catch (TypeException | SQLException e) { throw new TypeException("Could not set parameters for mapping: " + parameterMapping + ". Cause: " + e, e); } } } } }
MyBatis可以将查询结果,即结果集 ResultSet自动映射成实体类对象。这样使用者就无需再手动操作结果集,并将数据填充到实体类对象中。这可大大降低开发的工作量,提高工作效率。在 MyBatis中,结果集的处理工作由结果集处理器 ResultSetHandler执行。ResultSetHandler是一个接口,它只有一个实现类 DefaultResultSetHandler。结果集的处理入口方法是 handleResultSets,下面来看一下该方法的实现。
代码清单4.19的第12行return resultSetHandler.handleResultSets(statement);负责对执行结果进行处理,它将返回一个List<Object>
1 2 3 4 5 6 7 8 9 10 11 12 13 14 15 16 17 18 19 20 21 22 23 24 25 26 27 28 29 30 31 32 33 34 35 36 37 38 39 40 41 42 43 44 45 46 47 48 49 50 51 public List<Object> handleResultSets (Statement stmt) throws SQLException ErrorContext.instance() .activity("handling results" ).object(mappedStatement.getId()); final List<Object> multipleResults = new ArrayList<>(); int resultSetCount = 0 ; ResultSetWrapper rsw = getFirstResultSet(stmt); List<ResultMap> resultMaps = mappedStatement.getResultMaps(); int resultMapCount = resultMaps.size(); validateResultMapsCount(rsw, resultMapCount); while (rsw != null && resultMapCount > resultSetCount) { ResultMap resultMap = resultMaps.get(resultSetCount); handleResultSet(rsw, resultMap, multipleResults, null ); rsw = getNextResultSet(stmt); cleanUpAfterHandlingResultSet(); resultSetCount++; } String[] resultSets = mappedStatement.getResultSets(); if (resultSets != null ) { while (rsw != null && resultSetCount < resultSets.length) { ResultMapping parentMapping = nextResultMaps.get(resultSets[resultSetCount]); if (parentMapping != null ) { String nestedResultMapId = parentMapping.getNestedResultMapId(); ResultMap resultMap = configuration.getResultMap(nestedResultMapId); handleResultSet(rsw, resultMap, null , parentMapping); } rsw = getNextResultSet(stmt); cleanUpAfterHandlingResultSet(); resultSetCount++; } } return collapseSingleResultList(multipleResults); }
下面从代码清单4.36的26行向下handleResultSet(rsw, resultMap, multipleResults, null);,看看单结果集的处理逻辑
1 2 3 4 5 6 7 8 9 10 11 12 13 14 15 16 17 18 19 20 21 22 23 24 25 26 27 28 29 30 31 32 private void handleResultSet (ResultSetWrapper rsw, ResultMap resultMap, List<Object> multipleResults, ResultMapping parentMapping) throws SQLException try { if (parentMapping != null ) { handleRowValues(rsw, resultMap, null , RowBounds.DEFAULT, parentMapping); } else { if (resultHandler == null ) { DefaultResultHandler defaultResultHandler = new DefaultResultHandler(objectFactory); handleRowValues(rsw, resultMap, defaultResultHandler, rowBounds, null ); multipleResults.add(defaultResultHandler.getResultList()); } else { handleRowValues(rsw, resultMap, resultHandler, rowBounds, null ); } } } finally { closeResultSet(rsw.getResultSet()); } }
我们先看看前面几个代码清单中一直出现的ResultSetWrapper,它是一个存储数据的类,它持有一个JDBC的ResultSet的引用,并且还保存了诸如列名列表、类名列表、JDBC类型列表等等其他信息。
1 2 3 4 5 6 7 8 9 10 11 12 13 14 public class ResultSetWrapper private final ResultSet resultSet; private final TypeHandlerRegistry typeHandlerRegistry; private final List<String> columnNames = new ArrayList<>(); private final List<String> classNames = new ArrayList<>(); private final List<JdbcType> jdbcTypes = new ArrayList<>(); private final Map<String, Map<Class<?>, TypeHandler<?>>> typeHandlerMap = new HashMap<>(); private final Map<String, List<String>> mappedColumnNamesMap = new HashMap<>(); private final Map<String, List<String>> unMappedColumnNamesMap = new HashMap<>(); }
我们继续从19行handleRowValues(rsw, resultMap, defaultResultHandler, rowBounds, null);向下,看看如何处理单行数据。
1 2 3 4 5 6 7 8 9 10 11 12 13 14 15 16 17 18 19 20 21 22 23 24 25 public void handleRowValues (ResultSetWrapper rsw, ResultMap resultMap, ResultHandler<?> resultHandler, RowBounds rowBounds, ResultMapping parentMapping) throws SQLException if (resultMap.hasNestedResultMaps()) { ensureNoRowBounds(); checkResultHandler(); handleRowValuesForNestedResultMap(rsw, resultMap, resultHandler, rowBounds, parentMapping); } else { handleRowValuesForSimpleResultMap(rsw, resultMap, resultHandler, rowBounds, parentMapping); } }
这个方法只是通过两条分支来处理嵌套映射和简单映射而已。我们从19行向下,继续看看handleRowValuesForSimpleResultMap如何处理简单映射
1 2 3 4 5 6 7 8 9 10 11 12 13 14 15 16 17 18 19 20 21 22 23 24 25 private void handleRowValuesForSimpleResultMap (ResultSetWrapper rsw, ResultMap resultMap, ResultHandler<?> resultHandler, RowBounds rowBounds, ResultMapping parentMapping) throws SQLException DefaultResultContext<Object> resultContext = new DefaultResultContext<>(); ResultSet resultSet = rsw.getResultSet(); skipRows(resultSet, rowBounds); while (shouldProcessMoreRows(resultContext, rowBounds) && !resultSet.isClosed() && resultSet.next()) { ResultMap discriminatedResultMap = resolveDiscriminatedResultMap(resultSet, resultMap, null ); Object rowValue = getRowValue(rsw, discriminatedResultMap, null ); storeObject(resultHandler, resultContext, rowValue, parentMapping, resultSet); } }
上面方法的逻辑主要有
根据RowBounds定位到指定行记录
循环处理多行数据
使用鉴别器处理ResultMap
映射ResultMap得到映射结果rowValue
存储结果
下面我们具体展开第1步和第4步
首先是从代码清单4.40的13行skipRows(resultSet, rowBounds);的第一步。
1 2 3 4 5 6 7 8 9 10 11 12 13 14 15 16 17 18 private void skipRows (ResultSet rs, RowBounds rowBounds) throws SQLException if (rs.getType() != ResultSet.TYPE_FORWARD_ONLY) { if (rowBounds.getOffset() != RowBounds.NO_ROW_OFFSET) { rs.absolute(rowBounds.getOffset()); } } else { for (int i = 0 ; i < rowBounds.getOffset(); i++) { if (!rs.next()) { break ; } } } }
MyBatis默认提供了RowBounds用于分页,从上面的代码中可以看出,这并非是一个高效的分页方式。除了使用 RowBounds,还可以使用一些第三方分页插件进行分页。
然后是从代码清单4.40的21行Object rowValue = getRowValue(rsw, discriminatedResultMap, null);的第四步,映射ResultMap得到映射结果rowValue的具体逻辑。
1 2 3 4 5 6 7 8 9 10 11 12 13 14 15 16 17 18 19 20 21 22 23 24 25 26 27 28 29 30 31 32 33 34 35 36 37 38 39 private Object getRowValue (ResultSetWrapper rsw, ResultMap resultMap, String columnPrefix) throws SQLException final ResultLoaderMap lazyLoader = new ResultLoaderMap(); Object rowValue = createResultObject(rsw, resultMap, lazyLoader, columnPrefix); if (rowValue != null && !hasTypeHandlerForResultObject(rsw, resultMap.getType())) { final MetaObject metaObject = configuration.newMetaObject(rowValue); boolean foundValues = this .useConstructorMappings; if (shouldApplyAutomaticMappings(resultMap, false )) { foundValues = applyAutomaticMappings(rsw, resultMap, metaObject, columnPrefix) || foundValues; } foundValues = applyPropertyMappings(rsw, resultMap, metaObject, lazyLoader,columnPrefix) || foundValues; foundValues = lazyLoader.size() > 0 || foundValues; rowValue = foundValues || configuration.isReturnInstanceForEmptyRow() ? rowValue : null ; } return rowValue; }
上述代码主要分为如下逻辑
创建实体类对象。4.2.5.1小节将展开分析。
检测结果集是否需要自动映射,若需要则进行自动映射。4.2.5.2小节将展开分析
按照<resultMap>中配置的映射关系进行映射。4.2.5.3小节将展开分析
对于创建实体类对象,MyBatis的维护者写了很多逻辑,以保证能成功创建实体类对象。如果实在无法创建,则抛出异常。
下面从代码清单4.42的第10行Object rowValue = createResultObject(rsw, resultMap, lazyLoader, columnPrefix);向下,看看如何创建实体类对象。
1 2 3 4 5 6 7 8 9 10 11 12 13 14 15 16 17 18 19 20 21 22 23 24 25 26 27 28 29 30 31 32 33 34 35 36 37 38 39 40 41 42 43 44 45 46 47 private Object createResultObject (ResultSetWrapper rsw, ResultMap resultMap, ResultLoaderMap lazyLoader, String columnPrefix) throws SQLException this .useConstructorMappings = false ; final List<Class<?>> constructorArgTypes = new ArrayList<>(); final List<Object> constructorArgs = new ArrayList<>(); Object resultObject = createResultObject(rsw, resultMap, constructorArgTypes, constructorArgs, columnPrefix); if (resultObject != null && !hasTypeHandlerForResultObject(rsw, resultMap.getType())) { final List<ResultMapping> propertyMappings = resultMap.getPropertyResultMappings(); for (ResultMapping propertyMapping : propertyMappings) { if (propertyMapping.getNestedQueryId() != null && propertyMapping.isLazy()) { resultObject = configuration.getProxyFactory() .createProxy(resultObject, lazyLoader, configuration, objectFactory, constructorArgTypes, constructorArgs); break ; } } } this .useConstructorMappings = resultObject != null && !constructorArgTypes.isEmpty(); return resultObject; }
创建实体类对象的逻辑被封装在了createResultObject的重载方法中。在创建好实体类之后,还需要对<resultMap>中配置的映射信息进行检测。若发现有关联查询,且关联查询结果的加载方式是延迟加载,就为实体类生成代理类。
然后我们从代码清单4.43的15行向下,看看createResultObject的重载方法
1 2 3 4 5 6 7 8 9 10 11 12 13 14 15 16 17 18 19 20 21 22 23 24 25 26 27 28 29 30 31 32 private Object createResultObject (ResultSetWrapper rsw, ResultMap resultMap, List<Class<?>> constructorArgTypes, List<Object> constructorArgs, String columnPrefix) throws SQLException { final Class<?> resultType = resultMap.getType(); final MetaClass metaType = MetaClass.forClass(resultType, reflectorFactory); final List<ResultMapping> constructorMappings = resultMap.getConstructorResultMappings(); if (hasTypeHandlerForResultObject(rsw, resultType)) { return createPrimitiveResultObject(rsw, resultMap, columnPrefix); } else if (!constructorMappings.isEmpty()) { return createParameterizedResultObject(rsw, resultType, constructorMappings, constructorArgTypes, constructorArgs, columnPrefix); } else if (resultType.isInterface() || metaType.hasDefaultConstructor()) { return objectFactory.create(resultType); } else if (shouldApplyAutomaticMappings(resultMap, false )) { return createByConstructorSignature(rsw, resultType, constructorArgTypes, constructorArgs); }else { throw new ExecutorException("Do not know how to create an instance of " + resultType); } }
createResultObject方法中包含了4 种创建实体类对象的方式。一般情况下,若无特殊要求,MyBatis 会通过ObjectFactory 调用默认构造方法创建实体类对象。ObjectFactory 是一个接口,大家可以实现这个接口,以按照自己的逻辑控制对象的创建过程。
在创建了实体类之后,我们需要把结果集中的属性映射到实体类中。这个过程分为两步
通过自动映射,将一部分没有在<ResultMap>中出现的属性的值设置到实体类中
将<ResultMap>中出现的属性的值设置到实体类中
本小节先分析第一步,下一小节分析第二步。
下面从代码清单4.42的23行foundValues = applyAutomaticMappings(rsw, resultMap, metaObject, columnPrefix) || foundValues;向下,看看自动映射的逻辑
1 2 3 4 5 6 7 8 9 10 11 12 13 14 15 16 17 18 19 20 21 22 23 24 25 26 27 28 29 30 31 32 33 34 35 36 private boolean applyAutomaticMappings (ResultSetWrapper rsw, ResultMap resultMap, MetaObject metaObject, String columnPrefix) throws SQLException List<UnMappedColumnAutoMapping> autoMapping = createAutomaticMappings(rsw, resultMap, metaObject, columnPrefix); boolean foundValues = false ; if (!autoMapping.isEmpty()) { for (UnMappedColumnAutoMapping mapping : autoMapping) { final Object value = mapping.typeHandler.getResult(rsw.getResultSet(), mapping.column); if (value != null ) { foundValues = true ; } if (value != null || (configuration.isCallSettersOnNulls() && !mapping.primitive)) { metaObject.setValue(mapping.property, value); } } } return foundValues; }
我们接着看看上述代码清单中出现UnMappedColumnAutoMapping类中都存储了什么信息。它主要用来存储每一个未出现在<resultMap>中的属性。
1 2 3 4 5 6 7 8 9 10 11 12 13 14 15 private static class UnMappedColumnAutoMapping private final String column; private final String property; private final TypeHandler<?> typeHandler; private final boolean primitive; public UnMappedColumnAutoMapping (String column, String property, TypeHandler<?> typeHandler, boolean primitive) this .column = column; this .property = property; this .typeHandler = typeHandler; this .primitive = primitive; } }
下面我们紧接代码清单4.45的第8行List<UnMappedColumnAutoMapping> autoMapping = createAutomaticMappings(rsw, resultMap, metaObject, columnPrefix);,看看这个未出现在<resultMap>中的属性的列表是如何构建出来的
1 2 3 4 5 6 7 8 9 10 11 12 13 14 15 16 17 18 19 20 21 22 23 24 25 26 27 28 29 30 31 32 33 34 35 36 37 38 39 40 41 42 43 44 45 46 47 48 49 50 51 52 53 54 55 56 57 58 59 60 61 62 63 64 65 66 67 68 69 70 71 72 73 74 75 76 77 78 79 80 private List<UnMappedColumnAutoMapping> createAutomaticMappings (ResultSetWrapper rsw, ResultMap resultMap, MetaObject metaObject, String columnPrefix) throws SQLException final String mapKey = resultMap.getId() + ":" + columnPrefix; List<UnMappedColumnAutoMapping> autoMapping = autoMappingsCache.get(mapKey); if (autoMapping == null ) { autoMapping = new ArrayList<>(); final List<String> unmappedColumnNames = rsw.getUnmappedColumnNames(resultMap, columnPrefix); for (String columnName : unmappedColumnNames) { String propertyName = columnName; if (columnPrefix != null && !columnPrefix.isEmpty()) { if (columnName.toUpperCase(Locale.ENGLISH).startsWith(columnPrefix)) { propertyName = columnName.substring(columnPrefix.length()); } else { continue ; } } final String property = metaObject.findProperty(propertyName, configuration.isMapUnderscoreToCamelCase()); if (property != null && metaObject.hasSetter(property)) { if (resultMap.getMappedProperties().contains(property)) { continue ; } final Class<?> propertyType = metaObject.getSetterType(property); if (typeHandlerRegistry .hasTypeHandler(propertyType, rsw.getJdbcType(columnName))) { final TypeHandler<?> typeHandler = rsw.getTypeHandler(propertyType, columnName); autoMapping.add( new UnMappedColumnAutoMapping(columnName, property, typeHandler, propertyType.isPrimitive())); } else { configuration.getAutoMappingUnknownColumnBehavior() .doAction(mappedStatement, columnName, property, propertyType); } } else { configuration.getAutoMappingUnknownColumnBehavior() .doAction(mappedStatement, columnName, (property != null ) ? property : propertyName, null ); } } autoMappingsCache.put(mapKey, autoMapping); } return autoMapping; }
上面的代码主要进行了如下工作
从ResultSetWrapper中获取未配置在<resultMap>中的列名
遍历上一步获取到的列名列表
若列名包含列名前缀,则移除前缀,得到属性名
将下划线形式的列名转化为驼峰形式
获取属性类型
获取类型处理器
创建一个UnMappedColumnAutoMapping来存储前面获取的信息
这7步中,只有第一步比较难理解,我们继续展开第一步的相关代码,从4.47的14行final List<String> unmappedColumnNames = rsw.getUnmappedColumnNames(resultMap, columnPrefix);向下。
1 2 3 4 5 6 7 8 9 10 11 12 13 14 15 16 17 18 public List<String> getUnmappedColumnNames (ResultMap resultMap, String columnPrefix) throws SQLException List<String> unMappedColumnNames = unMappedColumnNamesMap.get(getMapKey(resultMap, columnPrefix)); if (unMappedColumnNames == null ) { loadMappedAndUnmappedColumnNames(resultMap, columnPrefix); unMappedColumnNames = unMappedColumnNamesMap.get(getMapKey(resultMap, columnPrefix)); } return unMappedColumnNames; }
下面继续从4.48的11行loadMappedAndUnmappedColumnNames(resultMap, columnPrefix);向下,看看如何加载已映射与未映射的列名
1 2 3 4 5 6 7 8 9 10 11 12 13 14 15 16 17 18 19 20 21 22 23 24 25 26 27 28 29 30 31 32 33 34 35 36 37 38 39 40 private void loadMappedAndUnmappedColumnNames (ResultMap resultMap, String columnPrefix) throws SQLException List<String> mappedColumnNames = new ArrayList<>(); List<String> unmappedColumnNames = new ArrayList<>(); final String upperColumnPrefix = columnPrefix == null ? null : columnPrefix.toUpperCase(Locale.ENGLISH); final Set<String> mappedColumns = prependPrefixes(resultMap.getMappedColumns(), upperColumnPrefix); for (String columnName : columnNames) { final String upperColumnName = columnName.toUpperCase(Locale.ENGLISH); if (mappedColumns.contains(upperColumnName)) { mappedColumnNames.add(upperColumnName); } else { unmappedColumnNames.add(columnName); } } mappedColumnNamesMap .put(getMapKey(resultMap, columnPrefix), mappedColumnNames); unMappedColumnNamesMap .put(getMapKey(resultMap, columnPrefix), unmappedColumnNames); }
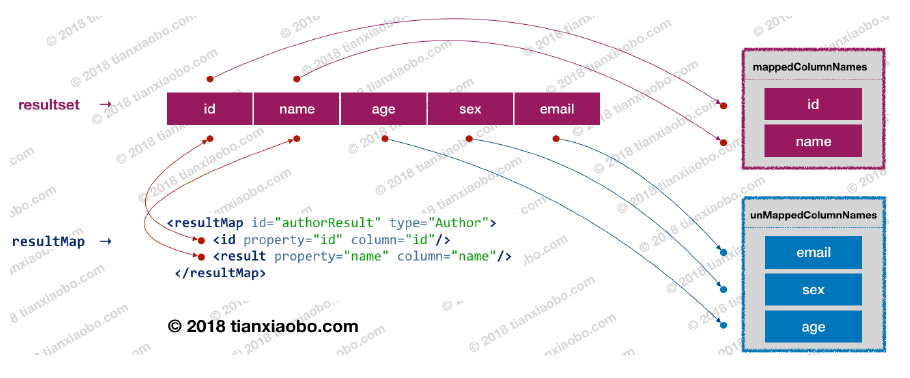
下面用一张图举例,看看这个分拣的结果
<resultMap>属性到实体类对象在完成了自动映射后,会将<resultMap>中定义过的列名加载到实体类中。我们从代码清单4.42的28行applyPropertyMappings(rsw, resultMap, metaObject, lazyLoader,columnPrefix)看看如何进行的映射。
1 2 3 4 5 6 7 8 9 10 11 12 13 14 15 16 17 18 19 20 21 22 23 24 25 26 27 28 29 30 31 32 33 34 35 36 37 38 39 40 41 42 43 44 45 46 47 48 49 50 51 52 53 54 55 56 57 58 59 60 61 62 63 64 65 66 67 68 69 70 private boolean applyPropertyMappings (ResultSetWrapper rsw, ResultMap resultMap, MetaObject metaObject, ResultLoaderMap lazyLoader, String columnPrefix) throws SQLException final List<String> mappedColumnNames = rsw.getMappedColumnNames(resultMap, columnPrefix); boolean foundValues = false ; final List<ResultMapping> propertyMappings = resultMap.getPropertyResultMappings(); for (ResultMapping propertyMapping : propertyMappings) { String column = prependPrefix(propertyMapping.getColumn(), columnPrefix); if (propertyMapping.getNestedResultMapId() != null ) { column = null ; } if (propertyMapping.isCompositeResult() || (column != null && mappedColumnNames.contains(column.toUpperCase(Locale.ENGLISH))) || propertyMapping.getResultSet() != null ) { Object value = getPropertyMappingValue(rsw.getResultSet(), metaObject, propertyMapping, lazyLoader, columnPrefix); final String property = propertyMapping.getProperty(); if (property == null ) { continue ; } else if (value == DEFERRED) { foundValues = true ; continue ; } if (value != null ) { foundValues = true ; } if (value != null || (configuration.isCallSettersOnNulls() && !metaObject.getSetterType(property).isPrimitive())) { metaObject.setValue(property, value); } } } return foundValues; }
上述代码主要完成了如下逻辑
首先从ResultSetWrapper 中获取已映射列名集合mappedColumnNames, 从ResultMap获取映射对象ResultMapping集合。
然后遍历ResultMapping集合
在遍历过程中调用getPropertyMappingValue获取指定指定列的数据
然后将获取到的数据设置到实体类对象中。
那么我们接着看看第三步,是怎么获取指定指定列的数据的。
1 2 3 4 5 6 7 8 9 10 11 12 13 14 15 16 17 18 19 20 21 22 23 24 25 26 27 28 29 30 31 private Object getPropertyMappingValue (ResultSet rs, MetaObject metaResultObject, ResultMapping propertyMapping, ResultLoaderMap lazyLoader, String columnPrefix) throws SQLException if (propertyMapping.getNestedQueryId() != null ) { return getNestedQueryMappingValue(rs, metaResultObject, propertyMapping, lazyLoader, columnPrefix); } else if (propertyMapping.getResultSet() != null ) { addPendingChildRelation(rs, metaResultObject, propertyMapping); return DEFERRED; } else { final TypeHandler<?> typeHandler = propertyMapping.getTypeHandler(); final String column = prependPrefix(propertyMapping.getColumn(), columnPrefix); return typeHandler.getResult(rs, column); } }
通过4.2.5.1-4.2.5.3,我们完成了实体类的创建,并向其中设置了各种属性。下面两个小节,我们看一看MyBatis如何实现关联查询和延迟加载的。
我们在学习 MyBatis框架时,会经常碰到一对一,一对多的使用场景。对于这样的场景,我们可以使用关联查询,将一条SQL拆成两条去完成查询任务。 MyBatis提供了两个标签用于支持一对一和一对多的使用场景,分别是 <association>和<collection>。
下面来看一看源码,上接代码清单4.51的第9行return getNestedQueryMappingValue(rs, metaResultObject, propertyMapping, lazyLoader, columnPrefix);
1 2 3 4 5 6 7 8 9 10 11 12 13 14 15 16 17 18 19 20 21 22 23 24 25 26 27 28 29 30 31 32 33 34 35 36 37 38 39 40 41 42 43 44 45 46 47 48 49 50 51 52 53 54 55 56 57 58 59 60 61 62 63 64 65 66 67 private Object getNestedQueryMappingValue (ResultSet rs, MetaObject metaResultObject, ResultMapping propertyMapping, ResultLoaderMap lazyLoader, String columnPrefix) throws SQLException final String nestedQueryId = propertyMapping.getNestedQueryId(); final String property = propertyMapping.getProperty(); final MappedStatement nestedQuery = configuration.getMappedStatement(nestedQueryId); final Class<?> nestedQueryParameterType = nestedQuery.getParameterMap().getType(); final Object nestedQueryParameterObject = prepareParameterForNestedQuery(rs, propertyMapping, nestedQueryParameterType, columnPrefix); Object value = null ; if (nestedQueryParameterObject != null ) { final BoundSql nestedBoundSql = nestedQuery.getBoundSql(nestedQueryParameterObject); final CacheKey key = executor.createCacheKey(nestedQuery, nestedQueryParameterObject, RowBounds.DEFAULT, nestedBoundSql); final Class<?> targetType = propertyMapping.getJavaType(); if (executor.isCached(nestedQuery, key)) { executor.deferLoad(nestedQuery, metaResultObject, property, key, targetType); value = DEFERRED; } else { final ResultLoader resultLoader = new ResultLoader(configuration, executor, nestedQuery, nestedQueryParameterObject, targetType, key, nestedBoundSql); if (propertyMapping.isLazy()) { lazyLoader.addLoader(property, metaResultObject, resultLoader); value = DEFERRED; } else { value = resultLoader.loadResult(); } } } return value; }
下面总结这个方法的逻辑
根据nestedQueryId获取MappedStatement
生成参数对象
获取BoundSql
检查一级缓存中是否有关联查询的结果。有,则将结果设置到实体类对象中
若一级缓存中没有,则创建结果加载器ResultLoader
检查当前属性是否需要进行延迟加载。若需要,则添加延迟加载相关的对象到loaderMap集合中。等待真正需要的时候再进行加载。
如不需要延迟加载,则直接通过结果加载器ResultLoader加载结果。
这一小节紧接上一小节,看看延迟加载的一些源码,上接代码清单4.52的55行lazyLoader.addLoader(property, metaResultObject, resultLoader);,我们看看添加延迟加载相关对象到loaderMap集合中的逻辑。
1 2 3 4 5 6 7 8 9 10 11 12 13 14 15 16 17 18 19 20 21 22 23 24 25 26 private final Map<String, LoadPair> loaderMap = new HashMap<>();public void addLoader (String property, MetaObject metaResultObject, ResultLoader resultLoader) String upperFirst = getUppercaseFirstProperty(property); if (!upperFirst.equalsIgnoreCase(property) && loaderMap.containsKey(upperFirst)) { throw new ExecutorException("Nested lazy loaded result property '" + property + "' for query id '" + resultLoader.mappedStatement.getId() + " already exists in the result map. " ); } loaderMap.put(upperFirst, new LoadPair(property, metaResultObject, resultLoader)); }
addLoader方法的参数最终都传给了LoadPair。该类的load方法会在内部调用ResultLoader的loadResult方法进行关联查询,并通过metaResultObject将查询结果设置到实体类对象中。那么LoadPair的load方法由谁来调用呢?答案是实体类的代理对象。
再分析源码之前,我们先来看看如何开启lazyLoad吧
1 2 3 4 5 6 <setting name ="lazyLoadingEnabled" value ="true" /> <setting name ="aggressiveLazyLoading" value ="false" /> <setting name ="lazyloadTriggerMethods" value ="equal,hashCode" />
MyBatis会为需要延迟加载的类生成代理类,代理逻辑会拦截实体类的方法调用。默认情况下,MyBatis会使用Javassist为实体类生成代理,代理逻辑封装在JavaassitProxyFactory类中。
1 2 3 4 5 6 7 8 9 10 11 12 13 14 15 16 17 18 19 20 21 22 23 24 25 26 27 28 29 30 31 32 33 34 35 36 37 38 39 40 41 42 43 44 45 46 47 48 49 50 51 52 53 54 55 56 57 58 59 60 61 62 public Object invoke (Object enhanced, Method method, Method methodProxy, Object[] args) throws Throwable final String methodName = method.getName(); try { synchronized (lazyLoader) { if (WRITE_REPLACE_METHOD.equals(methodName)) { Object original; if (constructorArgTypes.isEmpty()) { original = objectFactory.create(type); } else { original = objectFactory .create(type, constructorArgTypes, constructorArgs); } PropertyCopier.copyBeanProperties(type, enhanced, original); if (lazyLoader.size() > 0 ) { return new JavassistSerialStateHolder(original, lazyLoader.getProperties(), objectFactory, constructorArgTypes, constructorArgs); } else { return original; } } else { if (lazyLoader.size() > 0 && !FINALIZE_METHOD.equals(methodName)) { if (aggressive || lazyLoadTriggerMethods.contains(methodName)) { lazyLoader.loadAll(); } else if (PropertyNamer.isSetter(methodName)) { final String property = PropertyNamer.methodToProperty(methodName); lazyLoader.remove(property); } else if (PropertyNamer.isGetter(methodName)) { final String property = PropertyNamer.methodToProperty(methodName); if (lazyLoader.hasLoader(property)) { lazyLoader.load(property); } } } } } return methodProxy.invoke(enhanced, args); } catch (Throwable t) { throw ExceptionUtil.unwrapThrowable(t); } }
我们还可以从46行向下,看看实际的加载逻辑,但是这里就不继续了。
这部分的代码比较简单,它是从代码清单4.40的第23行storeObject(resultHandler, resultContext, rowValue, parentMapping, resultSet);向下的。这里不分析,仅仅贴出源码。
1 2 3 4 5 6 7 8 9 10 11 12 13 14 15 16 17 18 19 20 21 22 23 24 25 26 27 28 private void storeObject (ResultHandler<?> resultHandler, DefaultResultContext<Object> resultContext, Object rowValue, ResultMapping parentMapping, ResultSet rs) throws SQLException if (parentMapping != null ) { linkToParents(rs, parentMapping, rowValue); } else { callResultHandler(resultHandler, resultContext, rowValue); } } private void callResultHandler (ResultHandler<?> resultHandler, DefaultResultContext<Object> resultContext, Object rowValue) resultContext.nextResultObject(rowValue); ((ResultHandler<Object>) resultHandler).handleResult(resultContext); }
1 2 3 4 5 6 7 8 9 10 11 12 13 14 15 16 17 18 19 20 21 22 23 24 25 26 27 28 29 30 31 32 33 34 35 36 37 38 39 40 41 public class DefaultResultContext <T > implements ResultContext <T > private T resultObject; private int resultCount; private boolean stopped; public DefaultResultContext () resultObject = null ; resultCount = 0 ; stopped = false ; } @Override public T getResultObject () return resultObject; } @Override public int getResultCount () return resultCount; } @Override public boolean isStopped () return stopped; } public void nextResultObject (T resultObject) resultCount++; this .resultObject = resultObject; } @Override public void stop () this .stopped = true ; } }
1 2 3 4 5 6 7 8 9 10 11 12 13 14 15 16 17 18 19 20 21 22 23 24 25 26 public class DefaultResultHandler implements ResultHandler <Object > private final List<Object> list; public DefaultResultHandler () list = new ArrayList<>(); } @SuppressWarnings ("unchecked" ) public DefaultResultHandler (ObjectFactory objectFactory) list = objectFactory.create(List.class); } @Override public void handleResult (ResultContext<?> context) list.add(context.getResultObject()); } public List<Object> getResultList () return list; } }
经过前面前面的分析,相信大家对MyBatis 执行SQL 的过程都有比较深入的理解。本章的最后,用一张图MyBatis 的执行过程进行一个总结。如下:
在MyBatis 中,SQL 执行过程的实现代码是有层次的,每层都有相应的功能。
SqlSession 是对外接口的接口,因此它提供了各种语义清晰的方法,供使用者调用。Executor层做的事情较多,比如一二级缓存功能就是嵌入在该层内的。StatementHandler 层主要是与JDBC 层面的接口打交道。至于ParameterHandler 和ResultSetHandler,一个负责向SQL 中设置运行时参数,另一个负责处理SQL 执行结果,它们俩可以看做是StatementHandler辅助类。
最后看一下右边横跨数层的类,Configuration 是一个全局配置类,很多地方都依赖它。MappedStatement 对应SQL 配置,包含了SQL 配置的相关信息。BoundSql中包含了已完成解析的SQL 语句,以及运行时参数等。到此,关于SQL 的执行过程就分析完了。