第七章 插件机制
一般情况下,开源框架都会提供插件或其他形式的拓展点,供开发者自行拓展。以 MyBatis 为例,我们可基于 MyBatis 插件机制实现分页、分表,监控等功能。由于插件和业务无关,业务也无法感知插件的存在。因此可以无感植入插件,在无形中增强功能。
7.1 插件机制原理
我们在编写插件时,除了需要让插件类实现Interceptor接口外,还需要通过注解标注该插件的拦截点。所谓拦截点指的是插件所能拦截的方法,MyBatis 所允许拦截的拦截点如下:
| 类名 |
方法名 |
Executor |
update, query,flushStatements,commit, rollback,getTransaction, close, isClosed |
ParameterHandler |
getParameterObject, setParameters |
ResultSetHandler |
handleResultSets, handleOutputParameters |
StatementHandler |
prepare, parameterize, batch, update, query |
下面举个例子,假如我们想要拦截Executor的query方法,可以这样定义插件
1
2
3
4
5
6
7
8
9
10
11
|
@Intercepts({
@Signature(
type = Executor.class,
method = "query",
args ={MappedStatement.class, Object.class, RowBounds.class, ResultHandler.class}
)
})
public class ExamplePlugin implements Interceptor {
}
|
7.2 植入插件逻辑
下面我们以Executor为例,分析MyBatis是如何为Executor实例植入插件逻辑的。其实,原理还是动态代理。先看一看SqlSession的开启逻辑。
1
2
3
4
5
6
7
8
9
10
11
12
13
14
15
16
17
18
19
20
21
22
23
24
25
26
27
28
29
30
31
32
33
34
35
36
37
38
39
40
41
42
43
44
|
public SqlSession openSession() {
return openSessionFromDataSource(
configuration.getDefaultExecutorType(), null, false);
}
private SqlSession openSessionFromDataSource(ExecutorType execType,
TransactionIsolationLevel level,
boolean autoCommit) {
Transaction tx = null;
try {
final Environment environment = configuration.getEnvironment();
final TransactionFactory transactionFactory
= getTransactionFactoryFromEnvironment(environment);
tx = transactionFactory.newTransaction(
environment.getDataSource(), level, autoCommit);
final Executor executor = configuration.newExecutor(tx, execType);
return new DefaultSqlSession(configuration, executor, autoCommit);
} catch (Exception e) {
closeTransaction(tx);
throw ExceptionFactory
.wrapException("Error opening session. Cause: " + e, e);
} finally {
ErrorContext.instance().reset();
}
}
|
接着从第26行final Executor executor = configuration.newExecutor(tx, execType);向下,看看如何创建Executor
1
2
3
4
5
6
7
8
9
10
11
12
13
14
15
16
17
18
19
20
21
22
23
24
25
26
27
28
29
|
public Executor newExecutor(Transaction transaction, ExecutorType executorType) {
executorType = executorType == null ? defaultExecutorType : executorType;
executorType = executorType == null ? ExecutorType.SIMPLE : executorType;
Executor executor;
if (ExecutorType.BATCH == executorType) {
executor = new BatchExecutor(this, transaction);
} else if (ExecutorType.REUSE == executorType) {
executor = new ReuseExecutor(this, transaction);
} else {
executor = new SimpleExecutor(this, transaction);
}
if (cacheEnabled) {
executor = new CachingExecutor(executor);
}
executor = (Executor) interceptorChain.pluginAll(executor);
return executor;
}
|
接着从26行 executor = (Executor) interceptorChain.pluginAll(executor);向下,看看是如何植入插件链中的所有插件的。
1
2
3
4
5
6
7
8
9
10
11
12
13
14
15
16
17
18
19
20
21
22
23
24
25
26
|
public class InterceptorChain {
private final List<Interceptor> interceptors = new ArrayList<>();
public Object pluginAll(Object target) {
for (Interceptor interceptor : interceptors) {
target = interceptor.plugin(target);
}
return target;
}
public void addInterceptor(Interceptor interceptor) {
interceptors.add(interceptor);
}
public List<Interceptor> getInterceptors() {
return Collections.unmodifiableList(interceptors);
}
}
|
interceptor的plugin方法由具体的插件类实现,不过该方法代码一般比较固定,下面找一个实例分析下
1
2
3
4
5
|
public Object plugin(Object target){
return Plugin.wrap(target, this);
}
|
这是最简单的一种实现方式,它直接调用辅助类Plugin的wrap方法。我们来看看这个方法。
1
2
3
4
5
6
7
8
9
10
11
12
13
14
15
16
17
18
19
20
21
22
23
24
25
|
public static Object wrap(Object target, Interceptor interceptor) {
Map<Class<?>, Set<Method>> signatureMap = getSignatureMap(interceptor);
Class<?> type = target.getClass();
Class<?>[] interfaces = getAllInterfaces(type, signatureMap);
if (interfaces.length > 0) {
return Proxy.newProxyInstance(
type.getClassLoader(),
interfaces,
new Plugin(target, interceptor, signatureMap));
}
return target;
}
|
如上,plugin 方法在内部调用了Plugin 类的wrap 方法,用于为目标对象生成代理。Plugin类实现了InvocationHandler 接口,因此它可以作为参数传给Proxy 的newProxyInstance 方法。
此外,假如有多个拦截器,则会多次调用plugin方法,最终生成一个层层嵌套的代理类。如下图所示
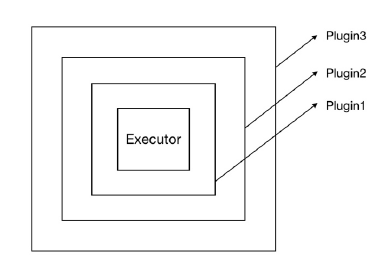
当Executor的某个方法执行时,插件逻辑会先行执行。执行顺序由外而内,比如上图的执行顺序为plugin3->plugin2->plugin1->Executor。
7.3 执行插件逻辑
Plugin 实现了 InvocationHandler 接口,因此它的 invoke 方法会拦截所有的方法调用。invoke 方法会对所拦截的方法进行检测,以决定是否执行插件逻辑。该方法的逻辑如下:
1
2
3
4
5
6
7
8
9
10
11
12
13
14
15
16
17
18
19
|
public Object invoke(Object proxy, Method method, Object[] args) throws Throwable {
try {
Set<Method> methods = signatureMap.get(method.getDeclaringClass());
if (methods != null && methods.contains(method)) {
return interceptor.intercept(new Invocation(target, method, args));
}
return method.invoke(target, args);
} catch (Exception e) {
throw ExceptionUtil.unwrapThrowable(e);
}
}
|
invoke 方法的代码比较少,逻辑不难理解。
- 首先,
invoke 方法会检测被拦截方法是否配置在插件的 @Signature 注解中
- 若是,则执行插件逻辑
- 最后,执行被拦截方法。
插件逻辑封装在intercept 中,该方法的参数类型为Invocation。Invocation 主要用于存储目标类,方法以及方法参数列表。下面简单看一下该类的定义。
1
2
3
4
5
6
7
8
9
10
11
12
13
14
15
16
17
18
19
20
21
22
23
24
25
26
27
28
29
30
31
|
public class Invocation {
private final Object target;
private final Method method;
private final Object[] args;
public Invocation(Object target, Method method, Object[] args) {
this.target = target;
this.method = method;
this.args = args;
}
public Object getTarget() {
return target;
}
public Method getMethod() {
return method;
}
public Object[] getArgs() {
return args;
}
public Object proceed() throws InvocationTargetException, IllegalAccessException {
return method.invoke(target, args);
}
}
|
到此,MyBatis插件机制就分析完了。