第五章 连接池
数据源主要用来获取数据库连接,本篇文章将向大家介绍 MyBatis 内置数据源的实现逻辑。MyBatis 支持三种数据源配置,分别为UNPOOLED、POOLED和JNDI。并提供了两种数据源实现,分别是UnpooledDataSource和PooledDataSource。
5.1 内置数据源配置和初始化过程
在分析数据源之前,先看一下数据源如何配置
1
2
3
4
5
6
7
8
| <environment>
<dataSource type="POOLED|UNPOOLED">
<property name="driver" value="com.mysql.cj.jdbc.Driver"/>
<property name="url" value="jdbcc:mysql//..."/>
<property name="username" value="root"/>
<property name="password" value="1234"/>
</dataSource>
</environment>
|
数据源的配置是内嵌在<environment>节点中的,MyBatis 在解析<environment>节点时,
会一并解析数据源的配置。MyBatis 会根据具体的配置信息,为不同的数据源创建相应工厂
类,通过工厂类即可创建数据源实例。
接下来我们就从对于<environment>节点的解析方法XMLConfigBuilder.environmentsElement开始源码分析之路
1
2
3
4
5
6
7
8
9
10
11
12
13
14
15
16
17
18
19
20
21
22
23
24
25
26
27
28
29
|
private void environmentsElement(XNode context) throws Exception {
if (context != null) {
if (environment == null) {
environment = context.getStringAttribute("default");
}
for (XNode child : context.getChildren()) {
String id = child.getStringAttribute("id");
if (isSpecifiedEnvironment(id)) {
TransactionFactory txFactory
= transactionManagerElement(child.evalNode("transactionManager"));
DataSourceFactory dsFactory
= dataSourceElement(child.evalNode("dataSource"));
DataSource dataSource = dsFactory.getDataSource();
Environment.Builder environmentBuilder = new Environment.Builder(id)
.transactionFactory(txFactory)
.dataSource(dataSource);
configuration.setEnvironment(environmentBuilder.build());
}
}
}
}
|
可以看到如何创建DataSourceFactory的逻辑在第14行的dataSourceElement(child.evalNode("dataSource"));中,我们继续打开它
1
2
3
4
5
6
7
8
9
10
11
12
13
14
15
16
17
18
|
private DataSourceFactory dataSourceElement(XNode context) throws Exception {
if (context != null) {
String type = context.getStringAttribute("type");
Properties props = context.getChildrenAsProperties();
DataSourceFactory factory
= (DataSourceFactory) resolveClass(type).newInstance();
factory.setProperties(props);
return factory;
}
throw new BuilderException("Environment declaration requires a DataSourceFactory.");
}
|
下面我们来看看DataSourceFactory的真面目,它是一个接口,它有两个实现PooledDataSourceFactory和UnpooledDataSourceFactory。
1
2
3
4
5
6
7
8
9
|
public interface DataSourceFactory {
void setProperties(Properties props);
DataSource getDataSource();
}
|
然后看一看它的第一个实现类PooledDataSourceFactory
1
2
3
4
5
6
7
8
9
10
11
12
13
14
15
16
17
18
19
20
21
22
23
24
25
26
27
28
29
30
31
32
33
34
35
36
37
38
39
40
41
42
43
44
45
46
47
48
49
50
51
52
53
54
55
56
57
58
59
60
61
62
63
64
65
66
67
68
69
70
71
72
73
74
75
76
77
78
79
80
81
82
83
84
85
86
87
|
public class UnpooledDataSourceFactory implements DataSourceFactory {
private static final String DRIVER_PROPERTY_PREFIX = "driver.";
private static final int DRIVER_PROPERTY_PREFIX_LENGTH
= DRIVER_PROPERTY_PREFIX.length();
protected DataSource dataSource;
public UnpooledDataSourceFactory() {
this.dataSource = new UnpooledDataSource();
}
@Override
public void setProperties(Properties properties) {
Properties driverProperties = new Properties();
MetaObject metaDataSource = SystemMetaObject.forObject(dataSource);
for (Object key : properties.keySet()) {
String propertyName = (String) key;
if (propertyName.startsWith(DRIVER_PROPERTY_PREFIX)) {
String value = properties.getProperty(propertyName);
driverProperties.setProperty(
propertyName.substring(DRIVER_PROPERTY_PREFIX_LENGTH),
value);
} else if (metaDataSource.hasSetter(propertyName)) {
String value = (String) properties.get(propertyName);
Object convertedValue
= convertValue(metaDataSource, propertyName, value);
metaDataSource.setValue(propertyName, convertedValue);
} else {
throw new DataSourceException("Unknown DataSource property: "
+ propertyName);
}
}
if (driverProperties.size() > 0) {
metaDataSource.setValue("driverProperties", driverProperties);
}
}
@Override
public DataSource getDataSource() {
return dataSource;
}
private Object convertValue(MetaObject metaDataSource,
String propertyName, String value) {
Object convertedValue = value;
Class<?> targetType = metaDataSource.getSetterType(propertyName);
if (targetType == Integer.class || targetType == int.class) {
convertedValue = Integer.valueOf(value);
} else if (targetType == Long.class || targetType == long.class) {
convertedValue = Long.valueOf(value);
} else if (targetType == Boolean.class || targetType == boolean.class) {
convertedValue = Boolean.valueOf(value);
}
return convertedValue;
}
}
|
然后我们再来看一看第二个实现类PooledDataSourceFactory,这个类继承自UnpooledDataSourceFactory只是在构造器初始化DataSource时,使用的是PooledDataSource的实例而已。仅此而已,其他方法的实现完全继承自父类。
1
2
3
4
5
6
7
8
9
|
public class PooledDataSourceFactory extends UnpooledDataSourceFactory {
public PooledDataSourceFactory() {
this.dataSource = new PooledDataSource();
}
}
|
我们就是通过这两个工厂来创建两种类型的DataSource,完成创建后返回的DataSource实例,将会被存储在Environment里,而Environment又会被存储入Configuration。于是,当我们要使用DataSource时,只需要调用configuration.getDataSource()即可。
5.2 UnpooledDataSource
UnpooledDataSource,从名称上即可知道,该种数据源不具有池化特性。该种数据源每次会返回一个新的数据库连接,而非复用旧的连接。
下面来看看如何通过它来获取数据库连接
1
2
3
4
5
6
7
8
9
10
11
|
private Connection doGetConnection(Properties properties) throws SQLException {
initializeDriver();
Connection connection = DriverManager.getConnection(url, properties);
configureConnection(connection);
return connection;
}
|
如上,获取数据库连接总共分为3步
- 初始化数据库驱动,详见5.2.1
- 通过数据库驱动获得数据库连接
- 配置数据库连接,详见5.2.3
5.2.1 初始化数据库驱动
下面我们展开代码清单5.6的第五行initializeDriver();,看看如何初始化数据库驱动。
1
2
3
4
5
6
7
8
9
10
11
12
13
14
15
16
17
18
19
20
21
22
23
24
25
26
27
|
private synchronized void initializeDriver() throws SQLException {
if (!registeredDrivers.containsKey(driver)) {
Class<?> driverType;
try {
if (driverClassLoader != null) {
driverType = Class.forName(driver, true, driverClassLoader);
} else {
driverType = Resources.classForName(driver);
}
Driver driverInstance = (Driver)driverType.newInstance();
DriverManager.registerDriver(new DriverProxy(driverInstance));
registeredDrivers.put(driver, driverInstance);
} catch (Exception e) {
throw new SQLException("Error on UnpooledDataSource. Cause: " + e);
}
}
}
|
如上,initializeDriver方法主要包含三步操作,分别如下:
- 加载驱动
- 通过反射创建驱动实例
- 注册驱动实例
- 缓存驱动,上面代码中出现了缓存相关的逻辑,这个是用于避免重复注册驱动
5.2.2 配置数据库连接
接下来我们再看看从driver中获取连接之后,需要对连接进行哪些配置
1
2
3
4
5
6
7
8
9
10
11
12
|
private void configureConnection(Connection conn) throws SQLException {
if (autoCommit != null && autoCommit != conn.getAutoCommit()) {
conn.setAutoCommit(autoCommit);
}
if (defaultTransactionIsolationLevel != null) {
conn.setTransactionIsolation(defaultTransactionIsolationLevel);
}
}
|
5.3 PooledDataSource
PooledDataSource内部实现了连接池功能,用于复用数据库连接。因此,从效率上来说,PooledDataSource 要高于UnpooledDataSource。
5.3.1 辅助类介绍
PooledDataSource需要借助两个辅助类帮其完成功能,这两个辅助类分别是PoolState和PooledConnection。
-
PoolState用于记录连接池运行时的状态,比如连接获取次数,无效连接数量等。同时PoolState内部定义了两个PooledConnection集合,用于存储空闲连接和活跃连接。
-
PooledConnection内部定义了一个Connection类型的变量,用于指向真实的数据库连接。以及一个 Connection的代理类,用于对部分方法调用进行拦截。至于为什么要拦截,随后将进行分析。除此之外,PooledConnection内部也定义了一些字段,用于记录数据库连接的一些运行时状态。
接下来,我们来看一下 PooledConnection 的定义。
1
2
3
4
5
6
7
8
9
10
11
12
13
14
15
16
17
18
19
20
21
22
23
24
25
26
27
28
29
30
31
32
33
34
35
36
37
38
39
40
41
42
43
44
45
46
47
48
49
50
51
52
53
54
55
56
57
58
59
60
61
62
63
64
65
66
67
68
69
70
71
72
73
|
class PooledConnection implements InvocationHandler {
private static final String CLOSE = "close";
private static final Class<?>[] IFACES = new Class<?>[] { Connection.class };
private final int hashCode;
private final PooledDataSource dataSource;
private final Connection realConnection;
private final Connection proxyConnection;
private long checkoutTimestamp;
private long createdTimestamp;
private long lastUsedTimestamp;
private int connectionTypeCode;
private boolean valid;
public PooledConnection(Connection connection, PooledDataSource dataSource) {
this.hashCode = connection.hashCode();
this.realConnection = connection;
this.dataSource = dataSource;
this.createdTimestamp = System.currentTimeMillis();
this.lastUsedTimestamp = System.currentTimeMillis();
this.valid = true;
this.proxyConnection
= (Connection) Proxy.newProxyInstance(Connection.class.getClassLoader(),
IFACES, this);
}
@Override
public Object invoke(Object proxy, Method method,
Object[] args) throws Throwable {
String methodName = method.getName();
if (CLOSE.hashCode() == methodName.hashCode() && CLOSE.equals(methodName)) {
dataSource.pushConnection(this);
return null;
}
try {
if (!Object.class.equals(method.getDeclaringClass())) {
checkConnection();
}
return method.invoke(realConnection, args);
} catch (Throwable t) {
throw ExceptionUtil.unwrapThrowable(t);
}
}
}
|
下面我们再来看看PoolState的定义
1
2
3
4
5
6
7
8
9
10
11
12
13
14
15
16
17
18
19
20
21
22
23
24
25
26
27
28
29
30
31
32
33
34
35
36
37
|
public class PoolState {
protected PooledDataSource dataSource;
protected final List<PooledConnection> idleConnections = new ArrayList<>();
protected final List<PooledConnection> activeConnections = new ArrayList<>();
protected long requestCount = 0;
protected long accumulatedRequestTime = 0;
protected long accumulatedCheckoutTime = 0;
protected long claimedOverdueConnectionCount = 0;
protected long accumulatedCheckoutTimeOfOverdueConnections = 0;
protected long accumulatedWaitTime = 0;
protected long hadToWaitCount = 0;
protected long badConnectionCount = 0;
}
|
5.3.2 获取连接
下面看一下PooledDataSource如何获取连接,此处的逻辑比较复杂,先给出流程图
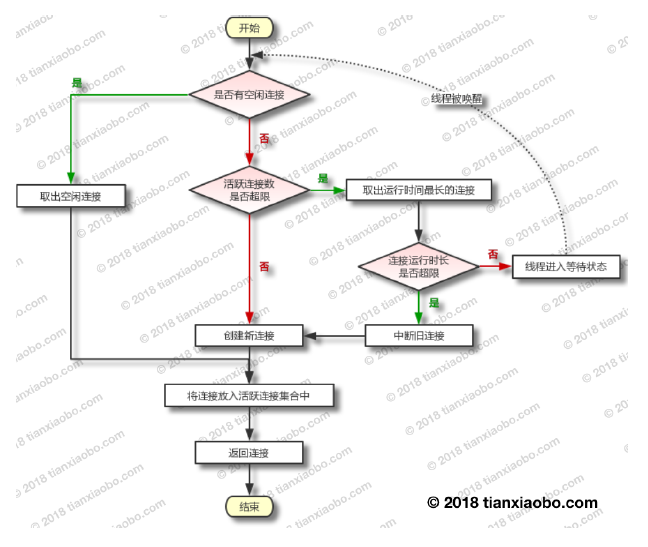
然后我们用一段伪代码演示这个流程图
1
2
3
4
5
6
7
8
9
10
11
12
13
14
15
16
17
18
19
20
| //id:5.11
if(连接池中有空闲连接){
1. 将连接从空闲连接集合中移除
}else{
if(活跃连接数未超出限制){
1. 创建新连接
}else{
1. 从活跃连接集合中取出第一个元素
2. 获取连接运行时长
if(连接超时){
1. 将连接从活跃集合中删除
2. 复用原连接的成员变量,并创建新的PooledConnection对象
}else{
1. 线程进入等待状态
2. 线程被唤醒,重新执行以上逻辑
}
}
}
1. 将连接添加到活跃连接集合中
2. 返回连接
|
最后,我们再来看源码
1
2
3
4
5
6
7
8
9
10
11
12
13
14
15
16
17
18
19
20
21
22
23
24
25
26
27
28
29
30
31
32
33
34
35
36
37
38
39
40
41
42
43
44
45
46
47
48
49
50
51
52
53
54
55
56
57
58
59
60
61
62
63
64
65
66
67
68
69
70
71
72
73
74
75
76
77
78
79
80
81
82
83
84
85
86
87
88
89
90
91
92
93
94
95
96
97
98
99
100
101
102
103
104
105
106
107
108
109
110
111
112
113
114
115
116
117
118
119
120
121
122
123
124
125
126
127
128
129
130
131
132
133
134
135
136
137
138
139
140
141
142
143
144
145
146
147
148
149
150
151
152
153
154
155
156
157
158
159
160
161
162
163
164
165
166
167
168
169
170
171
172
173
174
175
176
177
178
179
180
181
182
183
184
185
186
187
188
189
190
191
192
193
|
public Connection getConnection() throws SQLException {
return popConnection(dataSource.getUsername(),
dataSource.getPassword()).getProxyConnection();
}
private PooledConnection popConnection(String username, String password) throws SQLException {
boolean countedWait = false;
PooledConnection conn = null;
long t = System.currentTimeMillis();
int localBadConnectionCount = 0;
while (conn == null) {
synchronized (state) {
if (!state.idleConnections.isEmpty()) {
conn = state.idleConnections.remove(0);
if (log.isDebugEnabled()) {
log.debug("Checked out connection "
+ conn.getRealHashCode() + " from pool.");
}
} else {
if (state.activeConnections.size() < poolMaximumActiveConnections) {
conn = new PooledConnection(dataSource.getConnection(), this);
if (log.isDebugEnabled()) {
log.debug("Created connection "
+ conn.getRealHashCode() + ".");
}
} else {
PooledConnection oldestActiveConnection
= state.activeConnections.get(0);
long longestCheckoutTime =
oldestActiveConnection.getCheckoutTime();
if (longestCheckoutTime > poolMaximumCheckoutTime) {
state.claimedOverdueConnectionCount++;
state.accumulatedCheckoutTimeOfOverdueConnections
+= longestCheckoutTime;
state.accumulatedCheckoutTime += longestCheckoutTime;
state.activeConnections.remove(oldestActiveConnection);
if (!oldestActiveConnection
.getRealConnection().getAutoCommit()) {
try {
oldestActiveConnection.
getRealConnection().rollback();
} catch (SQLException e) {
log.debug("Bad connection. Could not roll back");
}
}
conn = new PooledConnection(oldestActiveConnection.
getRealConnection(), this);
conn.setCreatedTimestamp(
oldestActiveConnection.getCreatedTimestamp());
conn.setLastUsedTimestamp(
oldestActiveConnection.getLastUsedTimestamp());
oldestActiveConnection.invalidate();
if (log.isDebugEnabled()) {
log.debug("Claimed overdue connection "
+ conn.getRealHashCode() + ".");
}
} else {
try {
if (!countedWait) {
state.hadToWaitCount++;
countedWait = true;
}
if (log.isDebugEnabled()) {
log.debug("Waiting as long as "
+ poolTimeToWait
+ " milliseconds for connection.");
}
long wt = System.currentTimeMillis();
state.wait(poolTimeToWait);
state.accumulatedWaitTime
+= System.currentTimeMillis() - wt;
} catch (InterruptedException e) {
break;
}
}
}
}
if (conn != null) {
if (conn.isValid()) {
if (!conn.getRealConnection().getAutoCommit()) {
conn.getRealConnection().rollback();
}
conn.setConnectionTypeCode(
assembleConnectionTypeCode(
dataSource.getUrl(), username, password));
conn.setCheckoutTimestamp(System.currentTimeMillis());
conn.setLastUsedTimestamp(System.currentTimeMillis());
state.activeConnections.add(conn);
state.requestCount++;
state.accumulatedRequestTime += System.currentTimeMillis() - t;
} else {
if (log.isDebugEnabled()) {
log.debug("A bad connection ("
+ conn.getRealHashCode()
+ ") was returned from the pool"
}
state.badConnectionCount++;
localBadConnectionCount++;
conn = null;
if (localBadConnectionCount
> (poolMaximumIdleConnections +
poolMaximumLocalBadConnectionTolerance)) {
if (log.isDebugEnabled()) {
log.debug("PooledDataSource: Cbase.");
}
throw new SQLException("PooledDatase.");
}
}
}
}
}
if (conn == null) {
if (log.isDebugEnabled()) {
log.debug("PooledDataSourection.");
}
throw new SQLException("PooledDattion.");
}
return conn;
}
|
5.3.3 回收连接
然后我们来看一看回收连接的逻辑。回收连接成功与否只取决于空闲连接集合的状态,所需处理情况很少。
1
2
3
4
5
6
7
8
9
10
11
12
13
14
15
16
17
18
19
20
21
22
23
24
25
26
27
28
29
30
31
32
33
34
35
36
37
38
39
40
41
42
43
44
45
46
47
48
49
50
51
52
53
54
55
56
57
58
59
60
61
62
63
64
65
66
67
68
69
70
71
72
73
74
75
|
protected void pushConnection(PooledConnection conn) throws SQLException {
synchronized (state) {
state.activeConnections.remove(conn);
if (conn.isValid()) {
if (state.idleConnections.size() < poolMaximumIdleConnections
&& conn.getConnectionTypeCode() == expectedConnectionTypeCode) {
state.accumulatedCheckoutTime += conn.getCheckoutTime();
if (!conn.getRealConnection().getAutoCommit()) {
conn.getRealConnection().rollback();
}
PooledConnection newConn
= new PooledConnection(conn.getRealConnection(), this);
state.idleConnections.add(newConn);
newConn.setCreatedTimestamp(conn.getCreatedTimestamp());
newConn.setLastUsedTimestamp(conn.getLastUsedTimestamp());
conn.invalidate();
if (log.isDebugEnabled()) {
log.debug("Returned connection "
+ newConn.getRealHashCode() + " to pool.");
}
state.notifyAll();
} else {
state.accumulatedCheckoutTime += conn.getCheckoutTime();
if (!conn.getRealConnection().getAutoCommit()) {
conn.getRealConnection().rollback();
}
conn.getRealConnection().close();
if (log.isDebugEnabled()) {
log.debug("Closed connection " + conn.getRealHashCode() + ".");
}
conn.invalidate();
}
} else {
if (log.isDebugEnabled()) {
log.debug("A bad connecttion.");
}
state.badConnectionCount++;
}
}
}
|
上面代码首先将连接从活跃连接集合中移除,然后再根据空闲集合是否有空闲空间进行后续处理。如果空闲集合未满,此时复用原连接的字段信息创建新的连接,并将其放入空闲集合中即可。若空闲集合已满,此时无需回收连接,直接关闭即可。
我们知道获取连接的方法popConnection是由getConnection方法调用的,那回收连接的方法pushConnection是由谁调用的呢?答案是PooledConnection中的代理逻辑。我们来看看实际执行代理逻辑的invoke()方法都需要做什么。
1
2
3
4
5
6
7
8
9
10
11
12
13
14
15
16
17
18
19
20
21
22
23
24
25
26
27
28
29
|
public Object invoke(Object proxy, Method method, Object[] args) throws Throwable {
String methodName = method.getName();
if (CLOSE.hashCode() == methodName.hashCode() && CLOSE.equals(methodName)) {
dataSource.pushConnection(this);
return null;
}
try {
if (!Object.class.equals(method.getDeclaringClass())) {
checkConnection();
}
return method.invoke(realConnection, args);
} catch (Throwable t) {
throw ExceptionUtil.unwrapThrowable(t);
}
}
|
至此,回收连接的逻辑也看完了。